DTC Troubleshooting: P1706 (6-1) (L12A/L13A CVT)
DTC Troubleshooting: P1706 (6-1)
| DTC P1706: | Open in Transmission Range Switch Circuit |
NOTE: Record all freeze data and review General Troubleshooting Information before you troubleshoot.
| 1. | Check whether the DTC P1705 is indicated. Is the DTC P1705 indicated? YES - Perform the DTC P1705 troubleshooting, then go to 2 after troubleshooting. NO - Go to 8. |
| 2. | Turn the ignition switch OFF. |
| 3. | Reset the PCM memory by removing the No. 20 ECU (15A) fuse in the under-dash fuse/relay box for more than 10 seconds. |
| 4. | Start off in [D] position, and drive the vehicle until vehicle speed reaches 60 km/h (37 mph), then slow down and stop. |
| 5. | Turn the ignition switch OFF, then turn it ON (II) again. |
| 6. | Start off in [D] position, and drive the vehicle until vehicle speed reaches 60 km/h (37 mph), then slow down and stop. |
| 7. | While remaining the ignition switch ON (II) position, recheck for DTC P1706? Is the DTC P1706 indicated? YES - Go to 8. NO - The problem has been corrected.n |
| 8. | Test the transmission range switch. Is the switch OK? YES - Connect the transmission range switch connector, then go to 9. NO - Replace the transmission range switch.n |
| 9. | Turn the ignition switch OFF. |
| 10. | Check for continuity between PCM connector terminal A23 and body ground, and between terminal A24 and body ground.
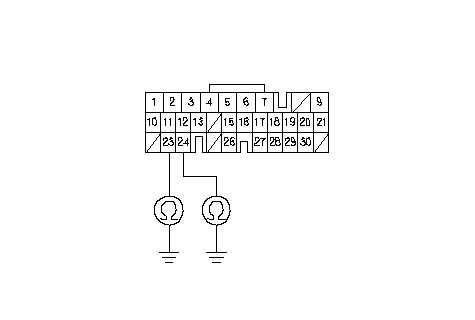 PCM CONNECTOR A (31P)LG1 (BRN/YEL)LG2 (BRN/YEL)Wire side of female terminals PCM CONNECTOR A (31P)LG1 (BRN/YEL)LG2 (BRN/YEL)Wire side of female terminalsIs there continuity? YES - Go to 11. NO - Repair open in the wire PCM connector terminals A23 and A24, and ground (G101), or repair poor ground ( G101).n |
| 11. | Turn the ignition switch ON (II). |
| 12. | Shift to [D] position. |
| 13. | Measure the voltage between PCM connector terminals C20 and A23 or A24.
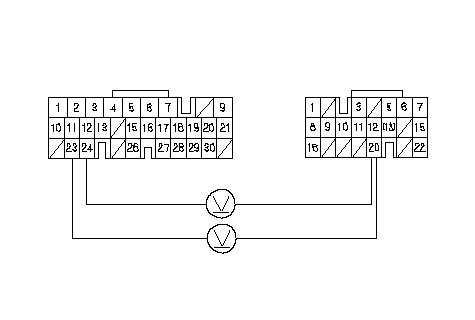 PCM CONNECTORSA (31P)C (22P)LG1 (BRN/YEL)LG2 (BRN/YEL)ATP D PCM CONNECTORSA (31P)C (22P)LG1 (BRN/YEL)LG2 (BRN/YEL)ATP D (PNK)Wire side of female terminals Is there voltage? YES - Repair open in the wire between PCM connector terminal C20 and the transmission range switch.n NO - Go to 14. |
| 14. | Shift to [R] position. |
| 15. | Measure the voltage between PCM connector terminal C10 and A23 or A24.
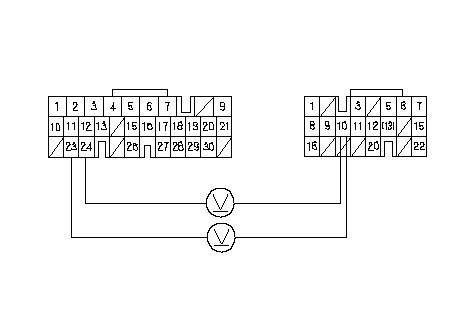 PCM CONNECTORSA (31P)C (22P)LG1 (BRN/YEL)LG2 (BRN/YEL)ATP R (WHT)Wire side of female terminals PCM CONNECTORSA (31P)C (22P)LG1 (BRN/YEL)LG2 (BRN/YEL)ATP R (WHT)Wire side of female terminalsIs there voltage? YES - Repair open in the wire between PCM connector terminal C10 and the transmission range switch.n NO - Go to 16. |
| 16. | Shift to [P] or [N] position. |
| 17. | Measure the voltage between PCM connector terminals C12 and A23 or A24.
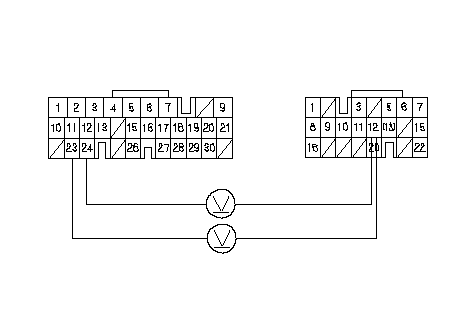 PCM CONNECTORSA (31P)C (22P)LG1 (BRN/YEL)LG2 (BRN/YEL)ATP NP PCM CONNECTORSA (31P)C (22P)LG1 (BRN/YEL)LG2 (BRN/YEL)ATP NP (LT GRN)Wire side of female terminals Is there voltage? YES - Repair open in the wire between PCM connector terminal C12 and the transmission range switch.n NO - Go to 18. |
| 18. | Shift to [S] position. |
| 19. | Measure the voltage between PCM connector terminals C9 and A23 or A24.
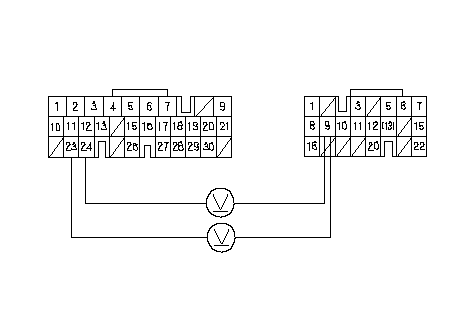 PCM CONNECTORSA (31P)C (22P)LG1 (BRN/YEL)LG2 (BRN/YEL)ATP S PCM CONNECTORSA (31P)C (22P)LG1 (BRN/YEL)LG2 (BRN/YEL)ATP S (BLU/WHT)Wire side of female terminals Is there voltage? YES - Repair open in the wire between PCM connector terminal C9 and the transmission range switch.n NO - Go to 20. |
| 20. | Shift to [L] position. |
| 21. | Measure the voltage between PCM connector terminals C11 and A23 or A24.
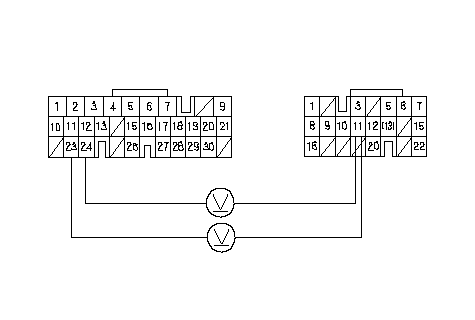 PCM CONNECTORSA (31P)C (22P)LG1 (BRN/YEL)LG2 (BRN/YEL)ATP L (BLU)Wire side of female terminals PCM CONNECTORSA (31P)C (22P)LG1 (BRN/YEL)LG2 (BRN/YEL)ATP L (BLU)Wire side of female terminalsIs there voltage? YES - Repair open in the wire between PCM connector terminal C11 and the transmission range switch.n NO - Update the PCM if it does not have the latest software, or subsutitute a known-good PCM, then recheck. If the symptom/ indication goes away with a known-good PCM, replace the original PCM.n |