Fuel Pressure Relieving
Before disconnecting fuel lines or hoses, relieve pressure from the system by stopping the fuel pump as following and disconnecting the fuel tube/quick connect fitting in the engine compartment.
| 1. | With the Honda PGM Tester or the HDS:
Remove the fuel fill cap.
|
| 2. | With the Honda PGM Tester or the HDS:
Turn the ignition switch ON (II).
|
| 3. | With the Honda PGM Tester or the HDS:
Do the FUEL PUMP OFF in the INSPECTION MENU.
|
| 4. | With the Honda PGM Tester or the HDS:
Start the engine and let it idle until the engine stalls.
NOTE:
|
| 5. | Turn the ignition switch OFF.
|
| 6. | Make sure you have the anti-theft codes for the radio, then write down the frequencies for the radio's preset buttons.
|
| 7. | Without the Honda PGM Tester or the HDS:
Remove the kick panel, then remove PGM-Fl main relay 2 (FUEL PUMP) (A) from the under-dash fuse/relay box.
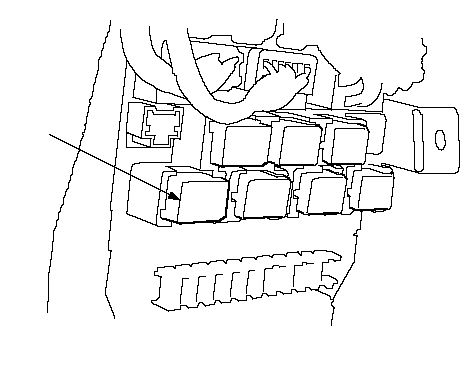 A*: The illustration shows LHD model. A*: The illustration shows LHD model. |
| 8. | Without the Honda PGM Tester or the HDS:
Start the engine, and let it idle until it stalls.
NOTE: If any DTCs are stored, clear and ignore them.
|
| 9. | Without the Honda PGM Tester or the HDS:
Turn the ignition switch OFF.
|
| 10. | Without the Honda PGM Tester or the HDS:
Remove the fuel fill cap, and relieve the pressure in the fuel tank.
|
| 11. | Disconnect the negative cable from the battery.
|
| 12. | Remove the quick-connect fitting cover (A).
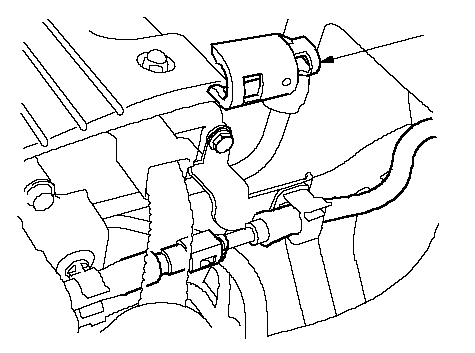 A A |
| 13. | Check the fuel quick-connect fitting for dirt, and clean if necessary.
|
| 14. | Place a rag or shop towel over the quick-connect fitting (A).
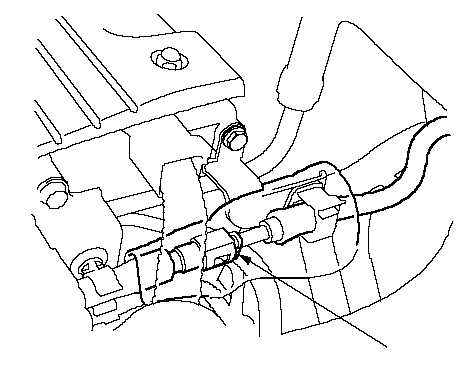 A A |
| 15. | Disconnect the quick-connect fitting (A): Hold the connector (B) with one hand and squeeze the retainer tabs (C) with the other hand to release them from the locking pawls (D). Pull the connector off.
NOTE:
- Prevent the remaining fuel in the fuel feed line or hose from flowing out with a rag or shop towel.
- Be careful not to damage the line (E) or other parts.
- Do not use tools.
- If the connector does not move, keep the retainer tabs pressed down, and alternately pull and push the connector until it comes off easily.
- Do not remove the retainer from the line; once removed, the retainer must be replaced with a new one.
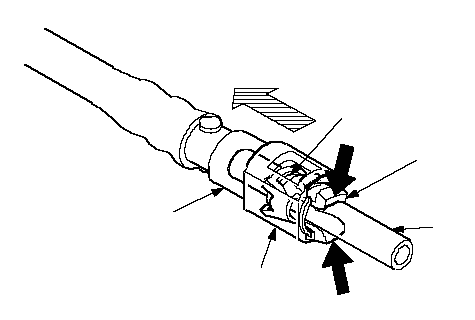 ABCED ABCED |
| 17. | Reconnect the negative cable to the battery and do the following items:
|