BACK WINDOW GLASS > REMOVAL |
| 1. DISCONNECT CABLE FROM NEGATIVE BATTERY TERMINAL |
| 2. REMOVE VISOR ASSEMBLY LH (Single Cab) |
Remove the 2 screws and visor.
| 3. BLEED VISOR ASSEMBLY RH (Single Cab) |
Remove the 2 screws and visor.
| 4. REMOVE VISOR HOLDER LH (Single Cab) |
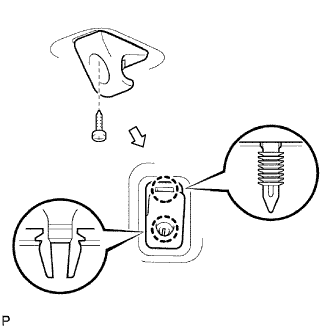 |
Remove the screw.
Using a screwdriver, detach the 2 claws and remove the holder.
| 5. REMOVE VISOR HOLDER RH (Single Cab) |
| 6. REMOVE FRONT SEAT ASSEMBLY (Single Cab Bench Seat Type) |
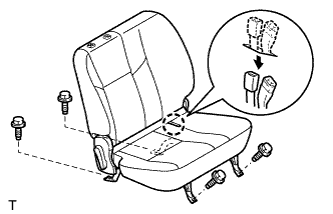 |
Pull the inner belts out from the bottom of the seat cushion.
Remove the 4 bolts.
w/ Occupant detection sensor:
Disconnect the connector under the seat.
Remove the seat.
| 7. REMOVE FRONT SEAT ASSEMBLY (Single Cab Separate Seat Type) |
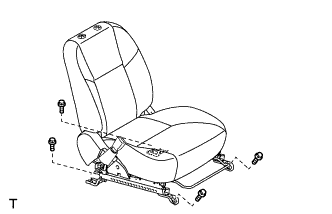 |
Lift up the seat track adjusting handle and move the seat to the rearmost position.
Remove the 2 bolts on the front side of the seat.
Lift up the seat track adjusting handle and move the seat to the foremost position.
Remove the 2 bolts on the rear side of the seat.
Lift up the seat track adjusting handle and move the seat to the center position. Also, operate the reclining adjuster release handle and move the seatback to the upright position.
w/ Seat belt warning, w/ occupant detection sensor:
Disconnect the connector under the seat.
Remove the seat.
| 8. REMOVE BACK PANEL GARNISH UPPER (Single Cab) |
 |
Using a screwdriver, detach the 4 claws.
Using a clip remover, detach the 5 clips and remove the garnish.
| 9. REMOVE FRONT DOOR SCUFF PLATE LH (Single Cab) |
 |
Using a screwdriver, detach the 8 claws.
Using a clip remover, detach the 4 clips and remove the scuff plate.
| 10. REMOVE FRONT DOOR SCUFF PLATE RH (Single Cab) |
| 11. REMOVE FRONT DOOR OPENING TRIM LH (Single Cab) |
| 12. REMOVE FRONT DOOR OPENING TRIM RH (Single Cab) |
| 13. REMOVE FRONT SEAT OUTER BELT ASSEMBLY LH (Single Cab) |
Remove the front seat outer belt assembly LH (Click here).
| 14. REMOVE FRONT SEAT OUTER BELT ASSEMBLY RH (Single Cab) |
Remove the front seat outer belt assembly RH (Click here).
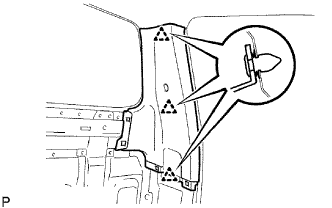
| 15. REMOVE QUARTER TRIM PANEL LOWER LH (Single Cab) |
 |
Using a screwdriver, detach the claw.
Using a clip remover, detach the 3 clips and remove the trim panel.
| 16. REMOVE QUARTER TRIM PANEL LOWER RH (Single Cab) |
| 17. REMOVE QUARTER INSIDE TRIM BOARD LH (Single Cab) |
 |
Using a clip remover, detach the 3 clips and remove the trim board.
| 18. REMOVE QUARTER INSIDE TRIM BOARD RH (Single Cab) |
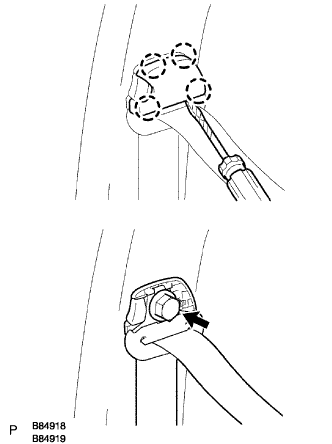
| 19. REMOVE ASSIST GRIP (Single Cab) |
 |
Using a screwdriver, detach the 4 claws and open the 2 covers.
Remove the 2 screws and assist grip.
| 20. REMOVE ROOM LIGHT ASSEMBLY (Single Cab) |
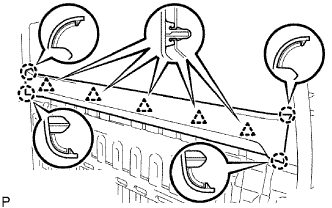
| 21. REMOVE ROOF HEADLINING ASSEMBLY (Single Cab) |
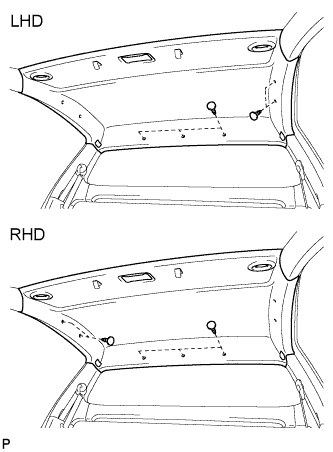 |
Using a clip remover, remove the 5 clips and headlining.
Remove the wire harness.
| 22. REMOVE FRONT DOOR SCUFF PLATE LH (Extra Cab) |
|
Using a screwdriver, detach the 8 claws.
Using a clip remover, detach the 4 clips and remove the scuff plate.
| 23. REMOVE FRONT DOOR SCUFF PLATE RH (Extra Cab) |
| 24. REMOVE FRONT DOOR OPENING TRIM LH (Extra Cab) |
| 25. REMOVE FRONT DOOR OPENING TRIM RH (Extra Cab) |
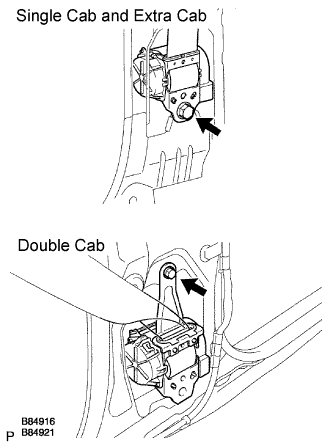
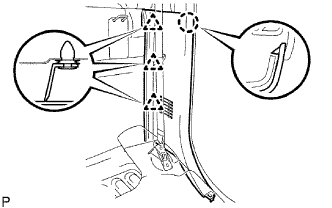
| 26. REMOVE FRONT SEAT OUTER BELT ASSEMBLY LH (Extra Cab) |
 |
Single cab:
Remove the outer belt shoulder anchor.
Using a screwdriver, detach the 2 claws and open the seat belt anchor cover.
Remove the bolt and shoulder anchor.
 |
Double cab:
Remove the outer belt shoulder anchor.
Using a screwdriver, disengage the 4 claws and remove the seat belt anchor cover cap.
Remove the bolt and shoulder anchor.
 |
w/o Pretensioner:
Remove the bolt and seat belt.
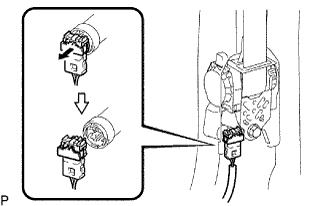 |
w/ Pretensioner:
Disconnect the pretensioner connector as shown in the illustration.
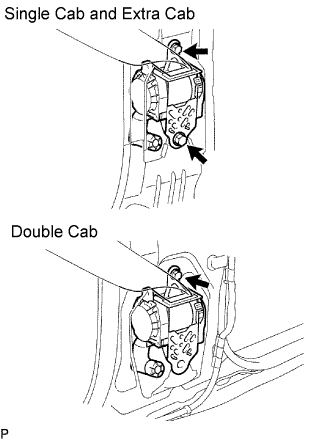 |
Remove the bolt and seat belt.
| 27. REMOVE FRONT SEAT OUTER BELT ASSEMBLY RH (Extra Cab) |
| 28. REMOVE REAR SEAT CUSHION ASSEMBLY LH (Extra Cab) |
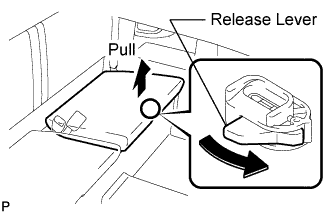 |
Pull the seat cushion lock hook's release lever in the direction of the arrow, and then disconnect the hook on the front of the seat cushion.
 |
Detach the seat cushion's 2 rear hooks from the vehicle body.
Remove the seat cushion.
| 29. REMOVE REAR SEAT CUSHION ASSEMBLY RH (Extra Cab) |
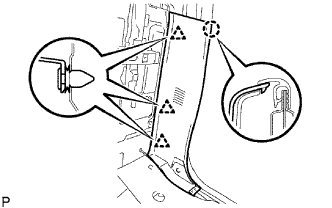
| 30. REMOVE BACK PANEL GARNISH UPPER (Extra Cab) |
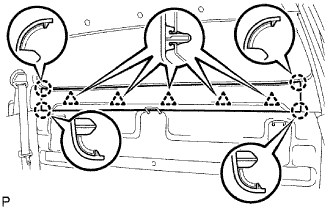 |
Using a screwdriver, detach the 4 claws.
Using a clip remover, detach the 5 clips and remove the garnish.
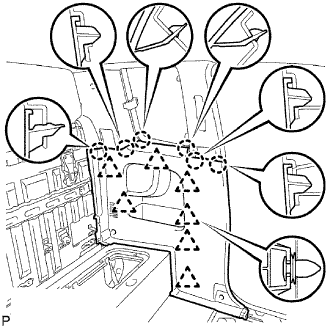
| 31. REMOVE BACK PANEL GARNISH LOWER (Extra Cab) |
 |
Using a screwdriver, detach the 6 claws.
Using a clip remover, detach the 5 clips and remove the garnish.
| 32. REMOVE QUARTER INSIDE TRIM BOARD LH (Extra Cab) |
 |
Using a clip remover, detach the 7 clips.
Using a screwdriver, detach the 6 claws and remove the trim board.
Detach the claws and remove the trim pocket from the trim board.
| 33. REMOVE QUARTER INSIDE TRIM BOARD RH (Extra Cab) |
| 34. REMOVE ROOF SIDE GARNISH INNER UPPER LH (Extra Cab) |
 |
Using a clip remover, detach the 3 clips and remove the garnish.
| 35. REMOVE ROOF SIDE GARNISH INNER UPPER RH (Extra Cab) |
| 36. REMOVE QUARTER PILLAR GARNISH LH (Extra Cab) |
 |
Using a clip remover, detach the 2 clips and remove the garnish.
| 37. REMOVE QUARTER PILLAR GARNISH RH (Extra Cab) |
| 38. REMOVE ROOF HEADLINING ASSEMBLY (Extra Cab) |
Remove the roof headlining assembly (Click here).
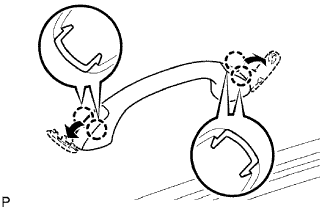
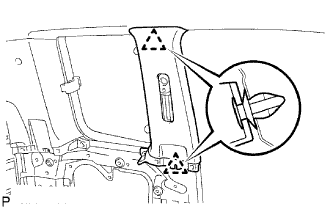
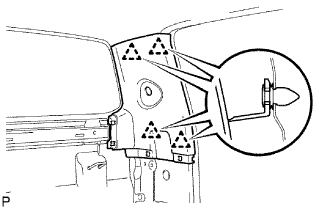
| 39. REMOVE REAR SEAT HINGE COVER LH (Double Cab) |
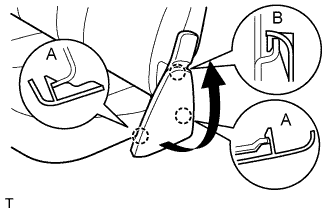 |
Using a screwdriver, detach the 2 claws labeled A.
Pull the hinge cover in the direction indicated by the arrow in the illustration to detach the claw labeled B. Then remove the hinge cover.
| 40. REMOVE REAR SEAT HINGE COVER RH (Double Cab) |
| 41. REMOVE REAR SEAT ASSEMBLY (Double Cab) |
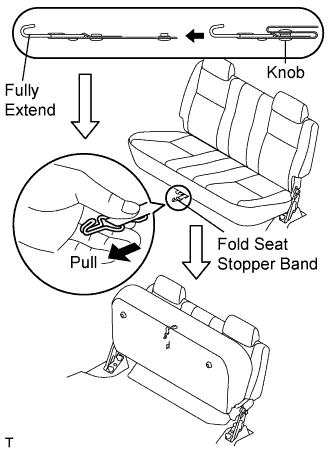 |
Remove the fold seat stopper band from the knob and fully extend the band.
Pull the fold seat stopper band and fold up the seat as shown in the illustration.
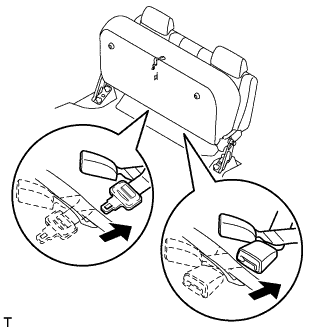 |
Pull the inner belts out from between the seat cushion and seatback.
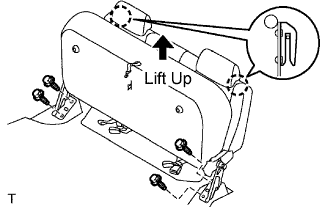 |
Remove the 4 bolts.
Lift up the seat in the direction indicated by the arrow in the illustration to detach the 2 hooks from the vehicle body. Then remove the seat.
| 42. REMOVE BACK PANEL GARNISH UPPER (Double Cab) |
|
Using a screwdriver, detach the 4 claws.
Using a clip remover, detach the 5 clips and remove the garnish.
| 43. REMOVE REAR DOOR SCUFF PLATE LH (Double Cab) |
 |
Using a screwdriver, detach the 7 claws.
Using a clip remover, detach the 2 clips and remove the scuff plate.
| 44. REMOVE REAR DOOR SCUFF PLATE RH (Double Cab) |
| 45. REMOVE REAR DOOR OPENING TRIM WEATHERSTRIP LH (Double Cab) |
| 46. REMOVE REAR DOOR OPENING TRIM WEATHERSTRIP RH (Double Cab) |
| 47. REMOVE REAR NO. 1 SEAT BELT ASSEMBLY OUTER LH (Double Cab) |
Remove the rear NO. 1 seat belt assembly outer LH (Click here).
| 48. REMOVE REAR NO. 1 SEAT BELT ASSEMBLY OUTER RH (Double Cab) |
Remove the rear NO. 1 seat belt assembly outer (Click here).
| 49. REMOVE QUARTER TRIM PANEL LOWER LH (Double Cab) |
 |
Using a screwdriver, detach the claw.
Using a clip remover, detach the 3 clips and remove the trim panel.
| 50. REMOVE QUARTER TRIM PANEL LOWER RH (Double Cab) |
| 51. REMOVE QUARTER INSIDE TRIM BOARD LH (Double Cab) |
 |
Using a clip remover, detach the 4 clips and remove the trim board.
| 52. REMOVE QUARTER INSIDE TRIM BOARD RH (Double Cab) |
| 53. REMOVE ASSIST GRIP (Double Cab) |
|
w/o Rear roof assist grip:
Using a screwdriver, detach the 4 claws and open the 2 covers.
w/o Rear roof assist grip:
Remove the 2 screws and assist grip.
w/ Rear roof assist grip:
Using a screwdriver, detach the 12 claws and open the 6 covers.
w/ Rear roof assist grip:
Remove the 6 screws and 3 assist grips.
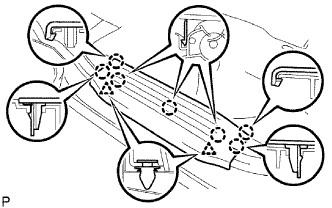
| 54. REMOVE ROOF HEADLINING ASSEMBLY (Double Cab) |
Remove the roof headlining assembly (Click here).
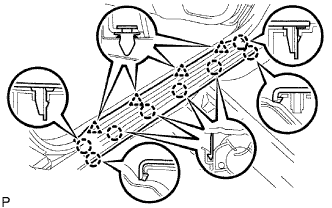
| 55. REMOVE BACK WINDOW GLASS |
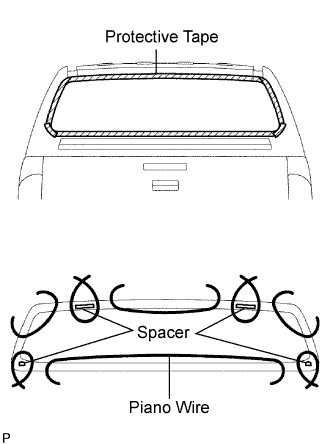 |
w/ Defogger:
Disconnect the back window defogger connector.
Apply protective tape to the outer surface of the vehicle body to prevent scratches.
From the interior, insert a piano wire between the vehicle body and glass as shown in the illustration.
Tie objects that can serve as handles (for example, wooden blocks) to all wire ends.
Cut through the adhesive by pulling the piano wire around the glass.
Using suction cups remove the glass.
| 56. CLEAN BACK WINDOW GLASS |
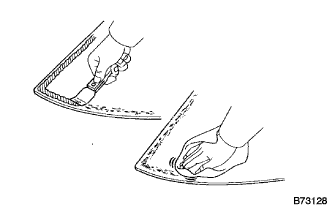 |
Using a scraper, remove the spacers, moulding and adhesive sticking to the glass.
Clean the outer edges of the glass with white gasoline.
| 57. CLEAN VEHICLE BODY |
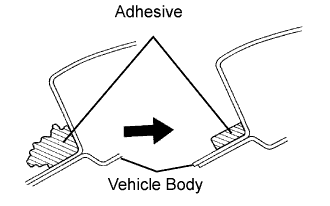 |
Clean and shape the contact surface of the vehicle body.
Use a knife to cut away excess adhesive on the contact surface of the vehicle body, as shown in the illustration.
Clean the contact surface of the vehicle body with cleaner.
