WATER PUMP > INSTALLATION |
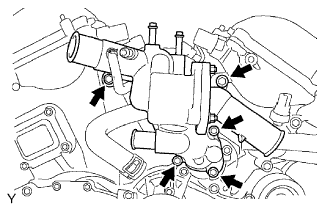
| 1. INSTALL WATER PUMP ASSEMBLY |
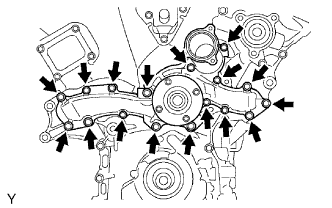 |
Install a new gasket and the water pump with the 17 bolts.
| 2. INSTALL V-RIBBED BELT TENSIONER ASSEMBLY |
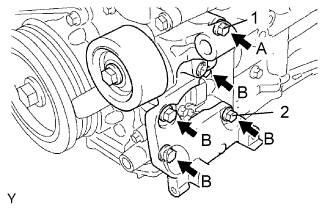 |
Temporarily install the V-ribbed belt tensioner with the 5 bolts.
Install the V-ribbed belt tensioner by tightening bolt 1 and then bolt 2.
Tighten the other bolts.
| 3. INSTALL GENERATOR ASSEMBLY |
 |
Install the generator and adjusting bar with the 2 bolts.
Install the generator wire with the nut.
Connect the generator connector.
| 4. INSTALL NO. 2 IDLER PULLEY SUB-ASSEMBLY |
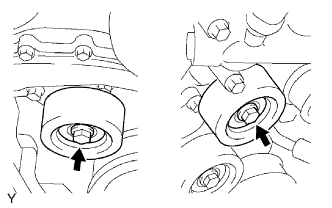 |
Install the 2 idlers pulleys with the 2 bolts.
| 5. INSTALL WATER INLET HOUSING |
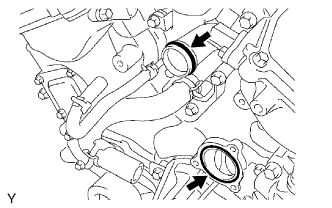 |
Install a new O-ring to the water outlet pipe.
Install a new gasket to the water pump.
Apply soapy water to the O-ring.
 |
Install the water inlet to the 5 bolts.
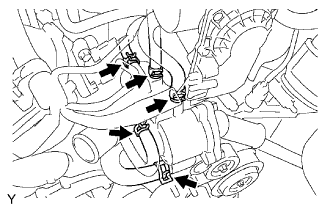 |
Connect the 5 water by-pass hoses.
| 6. CONNECT RADIATOR HOSE INLET |
| 7. CONNECT RADIATOR HOSE OUTLET |
| 8. INSTALL AIR CLEANER ASSEMBLY |
| 9. CONNECT NO. 2 VENTILATION HOSE |
| 10. INSTALL FAN SHROUD |
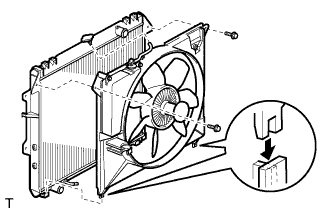 |
Install the fan pulley to the water pump.
Place the shroud together with the fluid coupling fan between the radiator and engine.
Install the coupling fan to the water pump with 4 nuts. Tighten the nuts as much as possible by hand.
Attach the shroud's claws to the radiator as shown in the illustration.
Install the shroud with the 2 bolts.
Connect the reservoir hose to the radiator tank upper.
Install the drive belt (Click here).
Tighten the 4 nuts of the fluid coupling fan.
| 11. CONNECT CABLE TO NEGATIVE BATTERY TERMINAL |
| 12. ADD ENGINE COOLANT |
Tighten all the plugs and fill the radiator with TOYOTA Super Long Life Coolant (SLLC).
| Item | Specified Condition |
| A/T | 9.8 liters (10.4 US qts, 8.6 lmp. qts) |
| M/T | 8.5 liters (9.0 US qts, 7.5 lmp. qts) |
Press the inlet and outlet radiator hoses several times by hand, and then check the level of the coolant.
Install the radiator cap.
Bleed air from the cooling system.
Warm up the engine until the thermostat opens. While the thermostat is open, circulate the coolant for several minutes.
Maintain the engine speed at 2,000 to 2,500 rpm.
Press the inlet and outlet radiator hoses several times by hand to bleed air.
Stop the engine and wait until the coolant cools down to ambient temperature.
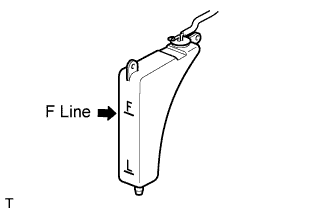 |
Check the coolant level in the radiator reservoir.
If the coolant level is low, add SLLC to the reservoir F line.
| 13. CHECK FOR ENGINE COOLANT LEAKS |
Check for the engine coolant leaks (Click here).
| 14. INSTALL V-BANK COVER |
| 15. INSTALL NO. 1 ENGINE UNDER COVER |
Install the under cover with the 4 bolts.
| 16. PERFORM INITIALIZATION |
Perform initialization (Click here).
