AUTOMATIC TRANSMISSION ASSEMBLY > REMOVAL |
| 1. DISCONNECT BATTERY TERMINAL |
| 2. REMOVE CONSOLE BOX ASSEMBLY |
Remove the console box assembly (Click here).
| 3. REMOVE SHIFT LEVER BOOT ASSEMBLY |
Remove the 4 screws and shift lever boot.
| 4. REMOVE TRANSFER HIGH AND LOW SHIFT LEVER ASSEMBLY |
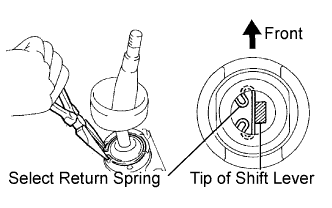 |
Remove the 4 bolts and transfer high and low shift lever.
Using needle-nose pliers, remove the snap ring and pull out the shift lever from the shift lever retainer.
| 5. REMOVE NO. 1 ENGINE UNDER COVER |
| 6. REMOVE NO. 2 ENGINE UNDER COVER |
| 7. REMOVE TRANSFER CASE LOWER PROTECTOR |
Remove the 4 bolts and transfer case lower protector.
| 8. DISCONNECT HEATED OXYGEN SENSOR |
| 9. REMOVE EXHAUST PIPE |
| 10. REMOVE FRONT PROPELLER SHAFT ASSEMBLY |
| 11. REMOVE PROPELLER SHAFT WITH CENTER BEARING ASSEMBLY |
| 12. DRAIN AUTOMATIC TRANSMISSION FLUID |
Remove the drain plug and gasket, and drain ATF.
Install a new gasket and the drain plug.
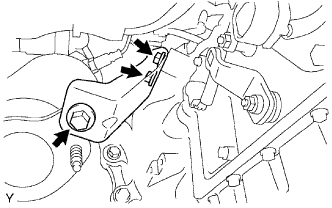
| 13. REMOVE MANIFOLD STAY |
 |
Remove the 3 bolts and manifold stay.
| 14. REMOVE NO .2 MANIFOLD STAY |
 |
Remove the 3 bolts and manifold stay.
| 15. REMOVE EXHAUST MANIFOLD SUB-ASSEMBLY LH |
Remove the 6 nuts, exhaust manifold and gasket.
| 16. REMOVE EXHAUST MANIFOLD SUB-ASSEMBLY RH |
Remove the 6 nuts, exhaust manifold and gasket.
| 17. DISCONNECT OIL COOLER TUBE |
 |
Using SST, disconnect the tube outlet and tube inlet.
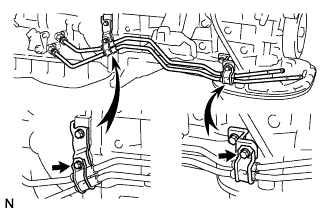 |
Remove the 2 bolts and 2 clamps.
| 18. DISCONNECT TRANSMISSION CONTROL CABLE ASSEMBLY |
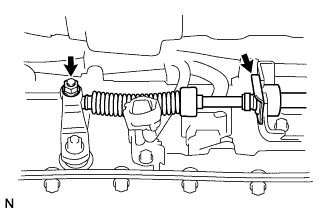 |
Remove the nut and disconnect the control cable.
Remove the clip and disconnect the control cable.
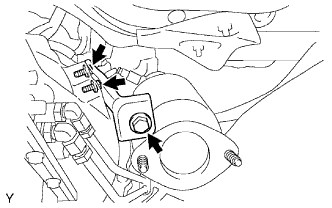
| 19. REMOVE NO. 1 TRANSMISSION CONTROL CABLE BRACKET |
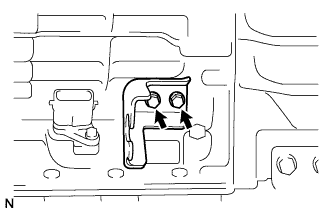 |
Remove the 2 bolts and control cable bracket from the transmission.
| 20. SUPPORT AUTOMATIC TRANSMISSION ASSEMBLY |
 |
Support the transmission with a transmission jack.
| 21. REMOVE NO. 3 FRAME CROSSMEMBER SUB-ASSEMBLY |
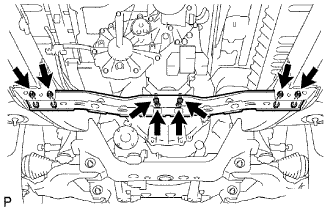 |
Remove the 4 set bolts of the No. 1 engine mounting insulator rear.
Remove the 4 nuts, 4 bolts and frame crossmember.
| 22. REMOVE NO. 1 ENGINE MOUNTING INSULATOR REAR |
 |
Remove the 4 bolts and engine mounting insulator rear from the automatic transmission.
| 23. DISCONNECT CONNECTOR |
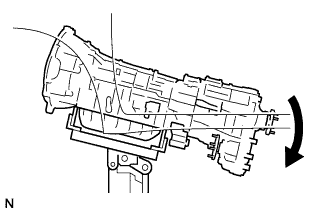 |
Tilt the transmission downward.
Transmission side:
Disconnect the connectors.
Disconnect the park/neutral position switch connector.
Disconnect the transmission wire connector.
Disconnect the 2 speed sensor connectors.
Transfer side:
Disconnect the connectors.
Disconnect the No. 1 indicator switch connector.
Disconnect the No. 2 indicator switch connector.
Disconnect the speed sensor connector.
| 24. DISCONNECT WIRE HARNESS |
| 25. REMOVE STARTER ASSEMBLY |
Remove the starter assembly (Click here).
| 26. REMOVE FLYWHEEL HOUSING SIDE COVER |
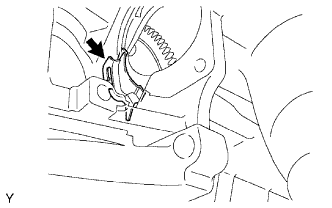 |
Remove the flywheel housing side cover from the cylinder block.
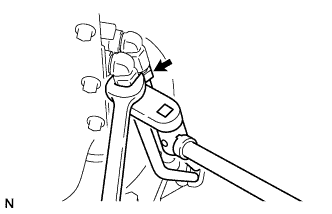
| 27. REMOVE AUTOMATIC TRANSMISSION ASSEMBLY |
 |
Turn the crankshaft to gain access to each bolt.
Hold the crankshaft pulley bolt with a wrench and remove the 6 torque converter clutch mounting bolts.
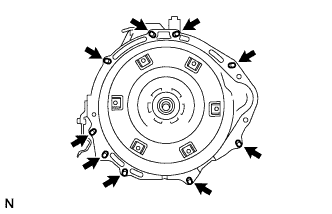 |
Remove the 9 bolts.
Separate and remove the automatic transmission assembly.
| 28. REMOVE TRANSFER ASSEMBLY |
Remove the transfer assembly (Click here).
| 29. REMOVE TORQUE CONVERTER CLUTCH ASSEMBLY |
