VALVE BODY ASSEMBLY > INSTALLATION

for Preparation Click here


NOTICE:
When working with FIPG material, perform the following:
  1. Using a razor blade and gasket scraper, remove all old FIPG material from the gasket surfaces.
  2. Clean all components thoroughly to remove all foreign matter.
  3. Clean both sealing surfaces with a non-residue solvent.
  4. Apply FIPG material in a continuous line approximately 1 mm (0.04 in.) in diameter on the sealing surface.
  5. Reassemble parts within 10 minutes of applying FIPG material. Failing to do so will require the FIPG material to be removed and reapplied.


1. INSTALL TRANSMISSION VALVE BODY ASSEMBLY


D028710E01
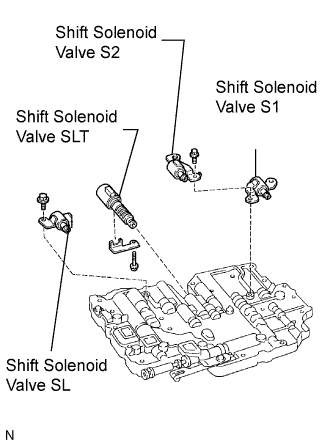
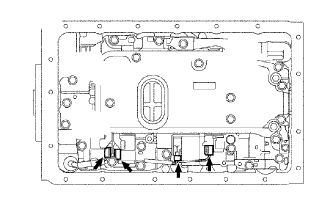
  1. Install the shift solenoid valve SL with the bolt.

    Torque:
    10 N*m{ 100 kgf*cm , 7 ft.*lbf }

  1. Install the shift solenoid valve S1 and S2 with the bolt.

    Torque:
    6.6 N*m{ 67 kgf*cm , 56 ft.*lbf }

  1. Install the shift solenoid valve SLT with the plate and bolt.

    Torque:
    6.4 N*m{ 65 kgf*cm , 56 ft.*lbf }


    AT08393E01
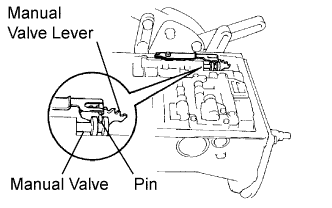
  1. Align the groove of the manual valve with the pin of the lever.


    D029011E02
  1. Install the 20 bolts.

    Torque:
    11 N*m{ 110 kgf*cm , 8 ft.*lbf }

    HINT:
    Bolt length:
    23 mm (0.91 in.) for A
    28 mm (1.10 in.) for B
    36 mm (1.42 in.) for C


2. INSTALL TRANSMISSION WIRE


G036410E01
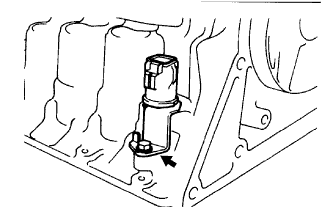
  1. Coat a new O-ring with ATF and install it to the transmission wire.

  1. Install the transmission wire to the case, and install the stopper plate with the bolt.

    Torque:
    5.4 N*m{ 55 kgf*cm , 48 in.*lbf }


    G037235E01
  1. Connect the 4 connectors to the 4 shift solenoid valves.


3. INSTALL VALVE BODY OIL STRAINER ASSEMBLY


D028706E03
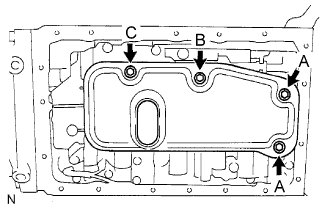
  1. Install 5 new gaskets.

  1. Install the oil strainer with the 4 bolts.

    Torque:
    10 N*m{ 100 kgf*cm , 7 ft.*lbf }

    HINT:
    Bolt length:
    14 mm (0.55 in.) for A
    20 mm (0.79 in.) for B
    23 mm (0.91 in.) for C


4. INSTALL AUTOMATIC TRANSMISSION OIL PAN SUB-ASSEMBLY


D029014E02

HINT:
Remove any packing material and be careful not to spill oil on the contacting surfaces of the transmission case and oil pan.

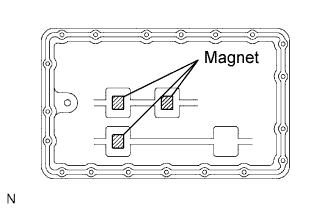
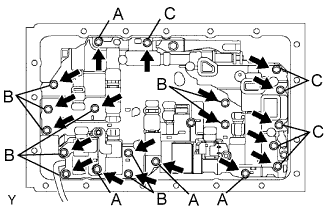
  1. Install the 3 magnets to the locations indicated in the illustration.


    D028715E01
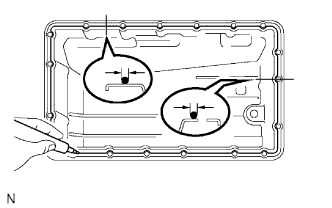
  1. Apply FIPG to the oil pan as shown in the illustration.

    FIPG:
    Part No. 08826-00090, THREE BOND 1281 or equivalent

  1. Install the oil pan with the 19 bolts.

    Torque:
    7.4 N*m{ 75 kgf*cm , 65 in.*lbf }


5. INSTALL TRANSMISSION OIL FILLER TUBE SUB-ASSEMBLY


G039346E01
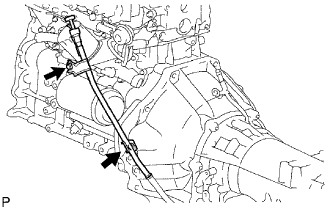
  1. Coat a new O-ring with ATF, and install it to the oil filler tube.

  1. Install the oil filler tube to the transmission with the 2 bolts.

    Torque:
    12 N*m{ 122 kgf*cm , 9 ft.*lbf }

  1. Install the oil level gauge.


6. CONNECT CABLE TO NEGATIVE BATTERY TERMINAL


7. PERFORM INITIALIZATION
  1. Perform initialization (Click here).

    NOTICE:
    Certain systems need to be initialized after disconnecting and reconnecting the cable from the negative (-) battery terminal.


8. ADD AUTOMATIC TRANSMISSION FLUID
  1. Add automatic transmission fluid (Click here).

    Fluid type:
    Toyota Genuine ATF TYPE T-IV


9. INSPECT AUTOMATIC TRANSMISSION FLUID
  1. Inspect the automatic transmission fluid (Click here).