DIFFERENTIAL VACUUM ACTUATOR > REPLACEMENT |
| 1. REMOVE FRONT SIDE MEMBER TO FRONT SUSPENSION CROSSMEMBER BRACE |
| 2. REMOVE NO. 1 ENGINE UNDER COVER |
| 3. REMOVE NO. 2 ENGINE UNDER COVER |
| 4. DRAIN DIFFERENTIAL OIL |
| 5. REMOVE DIFFERENTIAL VACUUM ACTUATOR ASSEMBLY |
 |
Remove the bolt and disconnect the differential breather tube bracket.
Support the differential with a jack.
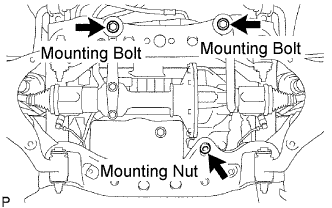
Remove the differential mounting nut No. 1.
Remove the 2 mounting bolts and 2 nuts.
Disconnect the actuator hose and connector.
Lower the jack.
 |
Remove the 4 bolts and vacuum actuator.
| 6. INSTALL DIFFERENTIAL VACUUM ACTUATOR ASSEMBLY |
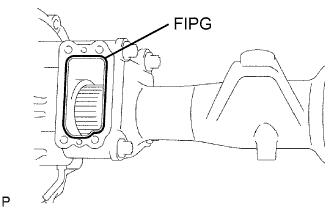 |
Remove any old FIPG material.
Using gasoline or alcohol, clean any residual FIPG material on the contact surfaces.
Apply FIPG to the differential tube, as shown in the illustration.
|
Clean the threads of the 4 bolts and retainer bolt holes with toluene or trichloroethylene.
Apply adhesive to 2 or 3 threads at the tip of the bolt.
Install the differential vacuum actuator to the differential tube with the 4 bolts.
|
Connect the actuator hose and connector.
Support the differential with a jack.
Install the 2 front mounting bolts and 2 nuts.
Install the differential mounting nuts No. 1.
Install the differential breather tube bracket with the bolt.
| 7. REFILL DIFFERENTIAL OIL |
Refill differential oil (Click here).
| 8. CHECK FOR DIFFERENTIAL OIL LEAKAGE |
 |
Stop the vehicle on a level surface.
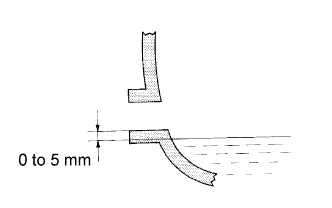
Remove the differential filler plug and gasket.
Check that the oil level is between 0 to 5 mm (0 to 0.20 in.) from the bottom lip of the differential filler plug hole.
| Temperature | Viscosity |
| Above -18°C (0°F) | SAE 90 |
| Below -18°C (0°F) | SAE 80W or 80W - 90 |
Check for oil leakage when the oil level is low.
Install the differential filler plug with a new gasket.
| 9. INSTALL NO. 2 ENGINE UNDER COVER |
| 10. INSTALL NO. 1 ENGINE UNDER COVER |
| 11. INSTALL FRONT SIDE MEMBER TO FRONT SUSPENSION CROSSMEMBER BRACE |
