FRONT DIFFERENTIAL CARRIER ASSEMBLY > INSTALLATION |
| 1. INSTALL DIFFERENTIAL CARRIER ASSEMBLY FRONT |
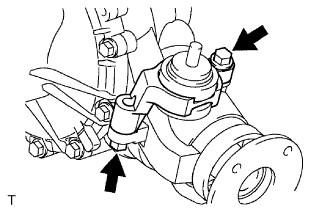 |
Install the front No. 3 differential support with the 2 bolts.
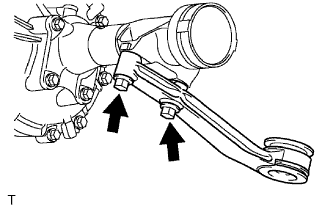 |
Install the No. 2 mounting support with the 2 bolts.
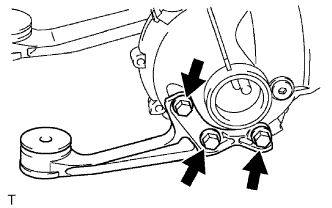 |
Install the No. 1 mounting support with the 3 bolts.
Support the front differential with jack.
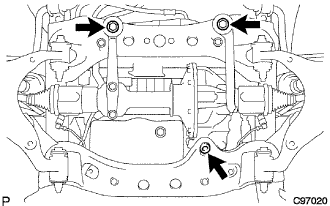 |
Install the 2 front mounting bolts and 2 nuts.
Install the front differential mounting nut No. 1.
Install the front differential breather tube bracket with the bolt.
Lower the jack.
| 2. INSTALL FRONT DRIVE SHAFT ASSEMBLY LH |
Install drive shaft (Click here).
| 3. INSTALL FRONT DRIVE SHAFT ASSEMBLY RH |
Install drive shaft (Click here).
| 4. INSTALL FRONT AXLE ASSEMBLY LH |
Install front axle (Click here).
| 5. INSTALL FRONT AXLE ASSEMBLY RH |
Install front axle (Click here).
| 6. INSTALL NO.1 FRONT SUSPENSION ARM SUB-ASSEMBLY LOWER LH |
Install the suspension arm lower for 2WD (Click here).
Install the suspension arm lower for 4WD (Click here).
| 7. INSTALL NO.1 FRONT SUSPENSION ARM SUB-ASSEMBLY LOWER RH |
Install the suspension arm lower for 2WD (Click here).
Install the suspension arm lower for 4WD (Click here).
| 8. INSTALL TIE ROD END SUB-ASSEMBLY LH |
| 9. INSTALL TIE ROD END SUB-ASSEMBLY RH |
| 10. INSTALL FRONT STABILIZER LINK ASSEMBLY LH |
Install stabilizer link (Click here).
| 11. INSTALL FRONT STABILIZER LINK ASSEMBLY RH |
Install stabilizer link (Click here).
| 12. INSTALL FRONT AXLE HUB LH NUT |
Install axle hub (Click here).
| 13. INSTALL FRONT AXLE HUB RH NUT |
Install axle hub (Click here).
| 14. INSPECT FRONT AXLE HUB BEARING BACKLASH |
Inspect axle hub bearing backlash (Click here).
| 15. INSPECT FRONT AXLE HUB DEVIATION |
Inspect axle hub bearing deviation (Click here).
| 16. INSTALL FRONT PROPELLER SHAFT ASSEMBLY |
Install propeller shaft (Click here).
| 17. REFILL DIFFERENTIAL OIL |
Refill differential oil (Click here).
| 18. CHECK FOR DIFFERENTIAL OIL LEAKAGE |
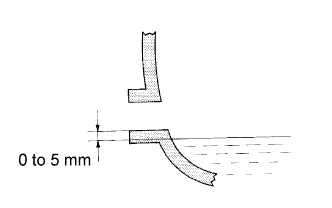 |
Stop the vehicle on a level surface.
Remove the differential filler plug and gasket.
Check that the oil level is between 0 to 5 mm (0 to 0.20 in.) from the bottom lip of the differential filler plug hole.
| Temperature | Viscosity |
| Above -18°C (0°F) | SAE 90 |
| Below -18°C (0°F) | SAE 80W or 80W - 90 |
Check for oil leakage when the oil level is low.
Install the differential filler plug with a new gasket.
| 19. INSTALL NO. 2 ENGINE UNDER COVER |
| 20. INSTALL NO. 1 ENGINE UNDER COVER |
| 21. INSTALL FRONT SIDE MEMBER TO FRONT SUSPENSION CROSSMEMBER BRACE |
| 22. INSTALL FRONT WHEEL |
| 23. CONNECT CABLE TO NEGATIVE BATTERY TERMINAL |
| 24. INSPECT AND ADJUST FRONT WHEEL ALIGNMENT |
Inspect and adjust front wheel alignment (Click here).
| 25. PERFORM INITIALIZATION |
Perform initialization (Click here).
