ENGINE > ON-VEHICLE INSPECTION |
| 1. INSPECT AIR CLEANER FILTER ELEMENT |
Remove the air filter.
Visually check that the air filter is not excessively damaged or oily.
If necessary, replace the air filter.
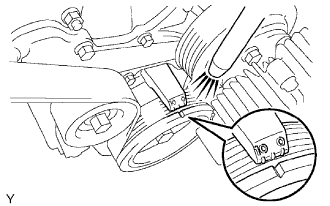
| 2. INSPECT V-RIBBED BELT TENSIONER |
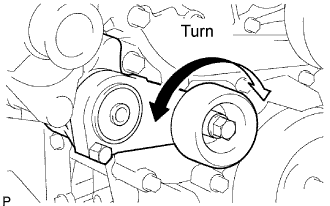 |
Idle the engine and then stop the engine. Check that the drive belt is between the edges of the tensioner pulley.
Remove the drive belt from the tensioner pulley.
Turn the pulley, and check that the tensioner bearing moves smoothly and quietly.
If necessary, replace the tensioner.
Install the drive belt.
| 3. INSPECT NO. 1 IDLER PULLEY |
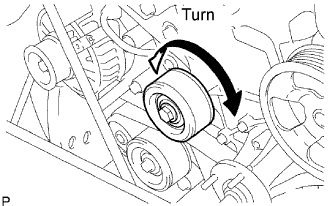 |
Idle the engine and then stop the engine. Check that the drive belt is between the edges of the idler pulley.
Remove the drive belt from the idler pulley.
Turn the pulley, and check that the idler bearing moves smoothly and quietly.
If necessary, replace the idler pulley.
Install the drive belt.
| 4. CHECK VALVE LASH ADJUSTER NOISE |
Rev up the engine several times. Check that the engine does not emit unusual noises.
If unusual noises occur, warm up the engine and idle it for over 30 minutes. Then repeat the step above.
| 5. INSPECT IGNITION TIMING |
Warm up the engine and stop the engine.
 |
When using the intelligent tester:
Check the ignition timing.
Connect the intelligent tester to the DLC3.
Start the engine at idle.
Turn the intelligent tester main switch ON.
Enter the following item: Powertrain / Engine and ECT / Data List / IGN Advance.
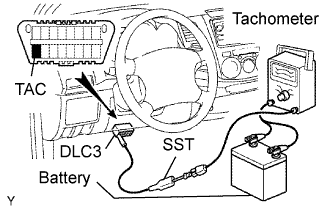 |
When not using the intelligent tester:
Check the ignition timing.
Using SST, connect tachometer probe to terminal TAC of the DLC3.
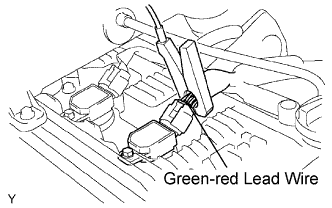 |
Clamp the tester probe of a timing light to the 4 lead wires or green/red lead wire of the ignition coil connector for No. 1 cylinder.
Start the engine.
 |
Using SST, connect terminals TC and CG of the DLC3.
 |
Using a timing light, measure the ignition timing.
Remove the SST from terminals 13 (TC) and 4 (CG) of the DLC3.
Check the ignition timing.
Confirm that ignition timing moves to the advanced angle side when the engine speed is increased.
Remove the timing light.
| 6. INSPECT ENGINE IDLE SPEED |
Warm up and stop the engine.
When using the intelligent tester: Check the idle speed.
|
Connect the intelligent tester to the DLC3.
Start the engine at idle.
Turn the intelligent tester main switch ON.
Enter the following item: Powertrain / Engine and ECT / Data List / Engine SPD.
|
When not using the intelligent tester:
Check the idle speed.
Using SST, connect tachometer tester probe to terminal 9 (TAC) of the DLC3.
Start the engine at idle.
Check the idle speed.
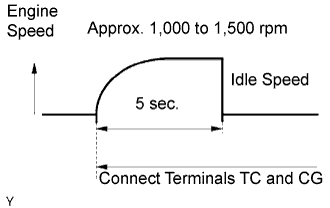
| 7. INSPECT IDLE SPEED CONTROL SYSTEM |
Warm up and stop the engine.
Check the idle speed control system.
|
Using SST, connect terminals TC and CG of the DLC3.
Start the engine at idle.
|
After connecting terminals (TC and CG), check that the engine speed changes to approximately 1,000 to 1,500 rpm for 5 seconds, and then returns to idle speed.
If the result is not as specified, check the throttle body, DTC (Click here) and wire harness.
| 8. INSPECT COMPRESSION |
Warm up and stop the engine.
Disconnect the injector connectors.
Remove the ignition coils.
Remove the spark plugs.
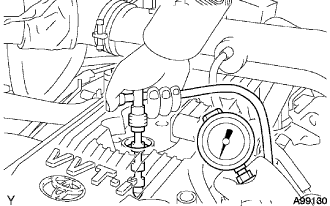 |
Check the cylinder compression pressure.
Insert a compression gauge into the spark plug hole.
Fully open the throttle.
While cranking the engine, measure the compression pressure.
| 9. CHECK CO (for Leaded Gasoline Specification Vehicle) |
Initial condition:
Engine at normal operating temperature
Air cleaner installed
All pipes and hoses of air induction system connected
All accessories switched OFF
All vacuum lines properly connected
SFI system wiring connectors fully seated
Ignition timing set correctly
Transmission in neutral position
Tachometer and CO meter calibration at idle
Warm up the engine under constant speed (approximately 50 km/h (31 mph)). Close the throttle valve for 5 minutes after the engine coolant temperature becomes stable (80 to 90°C (176 to 194°F)) and idle the engine for 5 minutes.
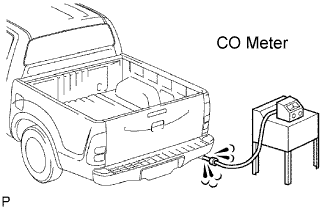 |
Insert a tester probe at least 40 cm (1.3 ft.) into the tailpipe.
Wait at least 1 minute before measuring to allow the concentration to stabilize. Complete the measuring within 3 minutes.
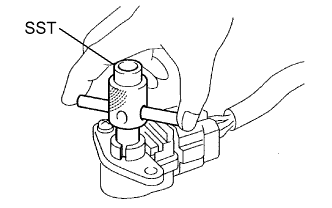 |
If the CO concentration does not conform to regulations, adjust by turning the idle mixture adjusting screw in the variable resistor with SST.
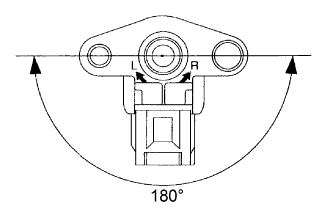 |
The idle mixture adjusting screw can be adjusted through an 180° angle range.
If the CO concentration is within specification, this adjustment is complete.
If the CO concentration cannot be corrected by idle mixture adjustment, see the table below for other possible causes.
| CO | Problems | Causes |
| High | Rough idle (black smoke from exhaust) |
|
| 10. CHECK CO/HC (for Unleaded Gasoline Specification Vehicle) |
Start and warm up the engine.
Run the engine at 2,500 rpm for approximately 180 seconds and idle the engine.
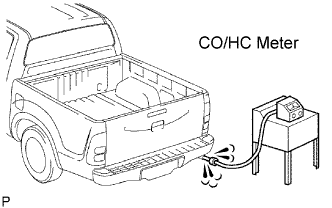 |
Insert CO/HC meter testing probe at least 40 cm (1.3 ft.) into the tailpipe.
Check CO/HC concentration at idle.
If the CO/HC concentration is not as specified, perform troubleshooting in the order given below.
Check the heated oxygen sensor operation (Click here).
See the table below for possible causes, and then inspect and repair the applicable causes if necessary.
| CO | HC | Problems | Causes |
| Normal | High | Rough idle |
|
| Low | High | Rough idle (Fluctuating HC reading) |
|
| High | High | Rough idle (Black smoke from exhaust) |
|
