FUEL TANK > REMOVAL

for Preparation Click here


1. DISCHARGE FUEL SYSTEM PRESSURE


2. DISCONNECT CABLE FROM NEGATIVE BATTERY TERMINAL

CAUTION:
Wait at least 90 seconds after disconnecting the cable from the negative (-) battery terminal to prevent airbag and seat belt pretensioner activation.


3. REMOVE FUEL TANK CAP


4. REMOVE NO. 3 FUEL TUBE CLAMP


    G038853E01
  1. Remove the tube clamp from the fuel tube.


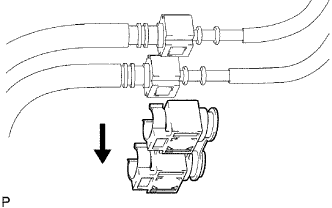
5. DISCONNECT FUEL MAIN TUBE AND FUEL RETURN TUBE


    A111068E01
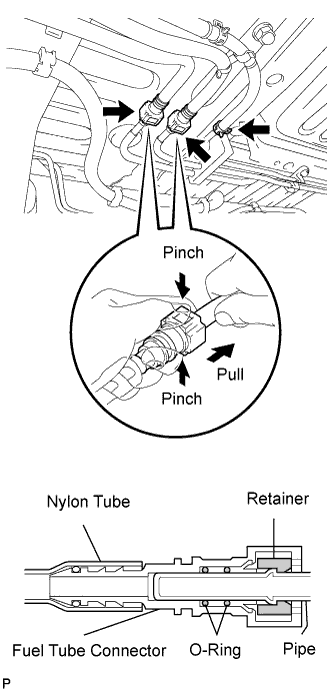
  1. Pinch and pull the main tube connector to disconnect the connector from the pipe. Then pinch and pull the return tube connector to disconnect the connector from the pipe.

    NOTICE:
    1. Check for foreign matter in the pipe and around the connector. Clean if necessary. Foreign matter may damage the O-ring or cause leaks in the seal between the pipe and connector.
    2. Do not use any tools to separate the pipe and connector.
    3. Do not forcefully bend or twist the nylon tube.
    4. Check for foreign matter on the pipe seal surface. Clean if necessary.
    5. Put the pipe and connector ends in plastic bags to prevent damage and foreign matter contamination.
    6. If the pipe and connector are stuck together, pinch the connector between your fingers and turn it carefully to disconnect it.

  1. Disconnect the EVAP hose.


6. DISCONNECT FUEL TANK TO FILLER PIPE HOSE


    A099799E01
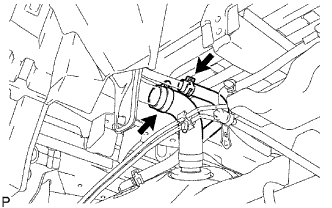
  1. Disconnect the filler pipe hose from the fuel tank filler pipe.


7. DISCONNECT FUEL TANK BREATHER HOSE
  1. Disconnect the breather hose from the fuel tank filler pipe.


8. REMOVE FUEL TANK FILLER PIPE
  1. Remove the bolt and filler pipe.


9. REMOVE FUEL TANK


    A099811E01
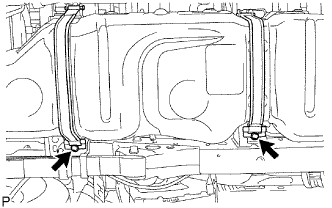
  1. Set a mission jack to the fuel tank.

  1. Remove the 2 bolts, 2 clips, 2 pins and 2 fuel tank bands.

  1. Slightly lower the mission jack.

    NOTICE:
    Be careful not to cut the wirings.


    G035038E01
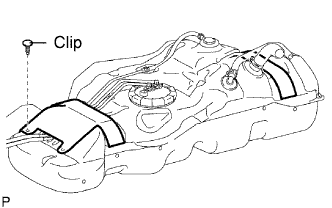
  1. Remove the clip. Then fold back approximately half of each cushion rubber so that the wire harness can be removed in the step below.


    G038621E01
  1. Disconnect the fuel pump connector and detach the 6 wire harness clips from the fuel tank.

    NOTICE:
    1. Before this procedure, check the connector for dirt, mud or other contamination.
    2. Do not use any tools in this procedure.


10. REMOVE NO. 1 FUEL TANK CUSHION


    G039811E01
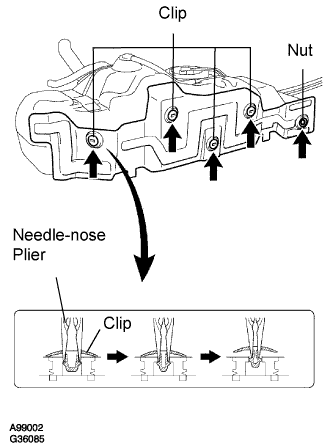
  1. Using needle-nose pliers, remove the 4 clips and nut as shown in the illustration and then remove the heat insulator.


    G038622E01
  1. Remove the clip and 2 fuel tank cushions from the fuel tank.


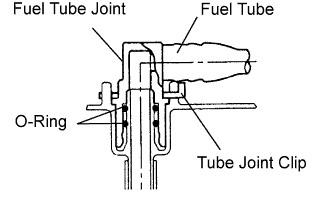
11. REMOVE FUEL PUMP GAUGE RETAINER


    A099441E01
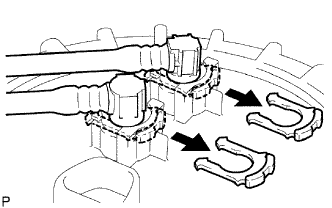
  1. Remove the 2 tube joint clips and pull out the 2 fuel tank tubes.

    NOTICE:

    1. A060575E02
      Before beginning this procedure, check for foreign matter in the fuel pump and gauge tube. Clean if necessary.
    2. Keep the O-ring free of foreign matter, as it becomes contaminated easily.
    3. Do not use any tools in this procedure.
    4. Do not forcefully bend or twist the tube.
    5. Put the tube in a plastic bag to prevent damage and contamination.
    6. Protect the fuel pump and gauge tube's joint with tape or equivalent to prevent contamination from foreign matter.
    7. If the fuel suction tube and tube are stuck together, pinch the tube and turn it carefully to disconnect it.


    A099442E01
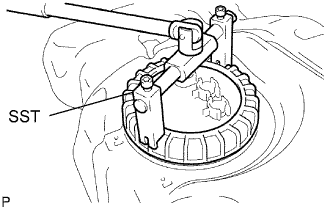
  1. Using SST, loosen the retainer.

    SST
    09808-14020   (09808-01410, 09808-01420, 09808-01430)

    HINT:
    Fit the tips of SST onto the ribs of the retainer.

    NOTICE:
    1. When the retainer is loosened, be careful as the fuel pump will spring upward from the force of the spring.
    2. Clean the fuel suction tube before this operation.

  1. Remove the retainer.


12. REMOVE FUEL SUCTION WITH PUMP AND GAUGE TUBE ASSEMBLY
  1. Remove the fuel gauge tube from the fuel tank.

    NOTICE:
    Be careful not to bend the arm of the fuel sender gauge.

  1. Remove the gasket from the fuel tank.