|
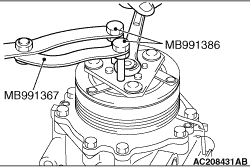
Use the special tools to remove the self-locking nut.
- Special spanner (MB991367)
- Pin (MB991386)
|
|
| caution |
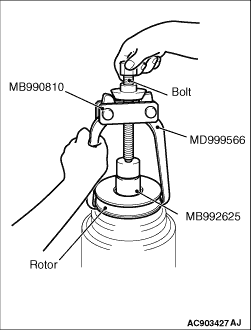
- Be sure to use the guide (MB992625) when the side bearing puller
(MB990810) is used to prevent the damage of A/C compressor.
- If the threaded shaft of side bearing puller (MB990810) is turned than necessary,
the rotor may be distorted. Therefore, turn the threaded shaft lightly only by hand without
using any tools.
|
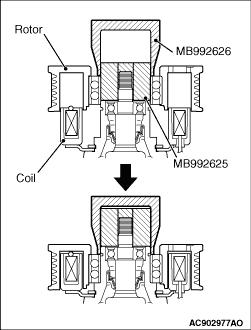
Rotor can be removed by hand, but if it is difficult to remove it, use the guide (MB992625)
and the side bearing puller (MB990810) as shown.
|
|
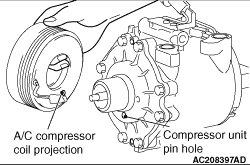
Install the A/C compressor coil while aligning the pin hole of A/C compressor
itself with the protrusion of A/C compressor coil
|
|
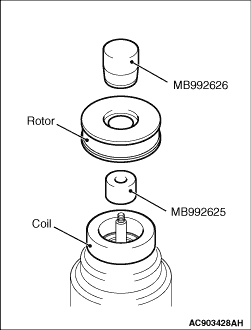
Install the rotor while pushing the inner wheel side slowly using the pusher (MB992626)
and guide (MB992625).
| note |
Insert the rotor in a direction perpendicular to the A/C compressor.
|
|
|
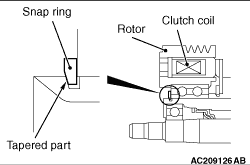
Use the snap ring plier and Install the snap ring so that the taper faces the outside.
|
|
|
Use the special tool as during removal to secure the armature and tighten the self-locking
nut.
|
|
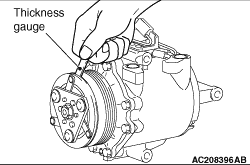
Check that the air gap of clutch satisfies the standard value. If not within the standard
value, use shims to adjust it.
Standard value: 0.25 - 0.50 mm
|
)

)
)
)
)
)
)
)