Inspection Procedure
3: No sound from one speaker. <COLT CZ3>
COMMENT ON TROUBLE SYMPTOM
The cause is probably a faulty speaker circuit system.
PROBABLE CAUSES
- Malfunction of the speaker.
- Damaged wiring harness or connector.
- Malfunction of the radio with CD player.
|
|
STEP 1. Check to see which speaker the sound is not output
from.
|
|
|
Use the speaker test to determine which speaker does not sound.
|
|
|
Q.
Which speaker is not working?
|
|
|
Front door speaker (LH) : Go to Step 2. : Go to Step 2.
|
|
|
|
|
|
Front door speaker (RH) : Go to Step 5.
|
|
|
|
|
|
Tweeter (LH) : Go to Step 8
|
|
|
|
|
|
Tweeter (RH) : Go to Step 11.
|
|
|
|
|
|
Rear speaker (LH) : Go to Step 14.
|
|
|
|
|
|
Rear speaker (RH) : Go to Step 17.
|
|
|
|
|
|
STEP 2. Check the front door speaker (LH).
|
|
|
(1)Remove the front door speaker (LH). Refer to  . .
|
|
|
(2)Check that the front door speaker (LH) generates noise when a five-volt voltage
is applied on the front door speaker (LH) terminal.
|
|
|
Q.
Is the front door speaker (LH) generating noise?
|
|
|
 Go to Step 3. Go to Step 3.
|
|
|
|
|
|
 Replace the front door speaker (LH). Replace the front door speaker (LH).
|
|
|
|
|
|
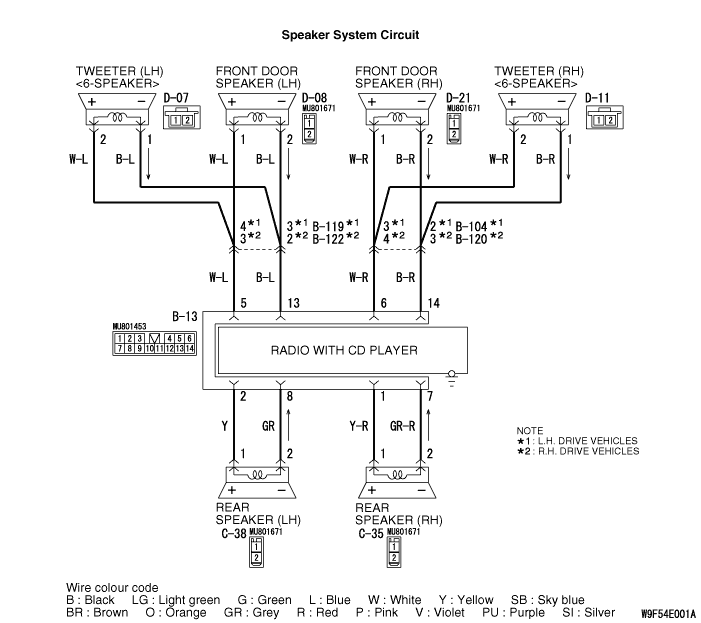
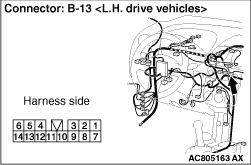
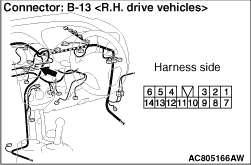
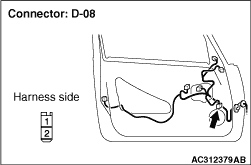
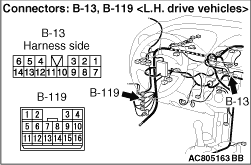
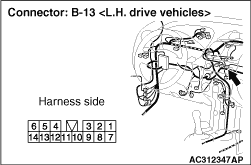
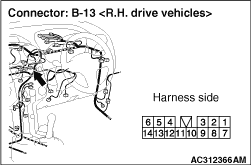
STEP 3. Connector check: Front door speaker (LH) connector D-08 and
radio with CD player connector B-13.
|
|
Q.
Are harness connectors D-08 and B-13 in good condition?
Go to Step 4.
Repair or replace the damage component(s).
|
|
|
STEP 4. Check the wiring harness between front door speaker (LH) connector
D-08 (terminal 1 and 2) and radio with CD player connector B-13 (terminals 5 and 13).
|
|
- Check the communication lines for open circuit and short circuit.
|
|
| note |
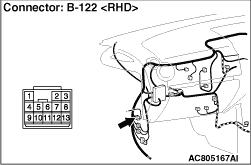
Prior to the wiring harness inspection, check intermediate connectors B-119 <LH
drive vehicles> or B-122 <RH drive vehicles>, and repair if necessary.
|
Q.
Is the wiring harness between front door speaker (LH) connector D-08 (terminals 1
and 2) and radio with CD player connector B-13 (terminals 5 and 13) in good condition?
Replace the radio with CD player.
Repair or replace the damage component(s).
|
|
|
STEP 5. Check the front door speaker (RH).
|
|
|
(1)Remove the front door speaker (RH). Refer to .
|
|
(2)Check that the front door speaker (RH) generates noise when a five-volt voltage is applied
on the front door speaker (RH) terminal.
Q.
Is the front door speaker (RH) generating noise?
Go to Step 6.
Replace the front door speaker (RH).
|
|
|
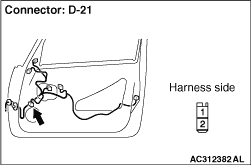
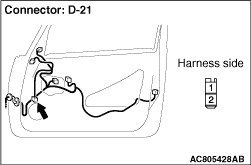
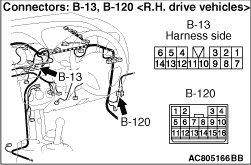
STEP 6. Connector check: Front door speaker (RH) connector D-21 and
radio with CD player connector B-13.
|
|
Q.
Are harness connectors D-21 and B-13 in good condition?
Go to Step 7.
Repair or replace the damage component(s).
|
|
|
STEP 7. Check the wiring harness between front door speaker (RH) connector
D-21 (terminals 1 and 2) and radio with CD player connector B-13 (terminals 6 and 14).
|
|
- Check the communication lines for open circuit and short circuit.
|
|
| note |
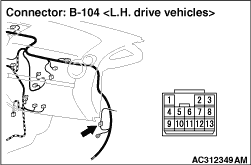
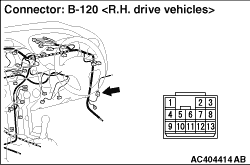
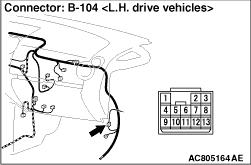
Prior to the wiring harness inspection, check intermediate connectors B-104 <LH
drive vehicles> or B-120 <RH drive vehicles>, and repair if necessary.
|
Q.
Is the wiring harness between front door speaker (RH) connector D-21 (terminals 1
and 2) and radio with CD player connector B-13 (terminals 6 and 14) in good condition?
Replace the radio with CD player.
Repair or replace the damage component(s).
|
|
|
STEP 8. Check the tweeter (LH).
|
|
|
(1)Remove the tweeter (LH). Refer to .
|
|
(2)Check that the tweeter (LH) generates noise when a five-volt voltage is applied on the
tweeter (LH) terminal.
Q.
Is the tweeter (LH) generating noise?
Go to Step 9.
Replace the tweeter (LH).
|
|
|
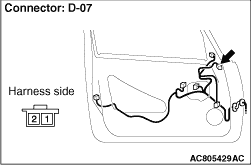
STEP 9. Connector check: Tweeter (LH) connector D-07 and radio with
CD player connector B-13.
|
|
Q.
Are harness connectors D-07 and B-13in good condition?
Go to Step 10.
Repair or replace the damage component(s).
|
|
|
STEP 10. Check the wiring harness between tweeter (LH) connector D-07
(terminals 1 and 2) and radio with CD player connector B-13 (terminals 5 and 13).
|
|
- Check the communication lines for open circuit and short circuit.
|
|
| note |
Prior to the wiring harness inspection, check intermediate connectors B-119 <LH
drive vehicles> or B-122 <RH drive vehicles>, and repair if necessary.
|
Q.
Is the wiring harness between tweeter (LH) connector D-07 (terminals 1 and 2) and
radio with CD player connector B-13 (terminals 13 and 5) in good condition?
Replace the radio with CD player.
Repair or replace the damage component(s).
|
|
|
STEP 11. Check the tweeter (RH).
|
|
|
(1)Remove the tweeter (RH). Refer to .
|
|
(2)Check that the tweeter (RH) generates noise when a five-volt voltage is applied on the
tweeter (RH) terminal.
Q.
Is the tweeter (RH) generating noise?
Go to Step 12.
Replace the tweeter (RH).
|
|
|
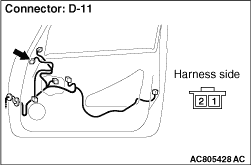
STEP 12. Connector check: Tweeter (RH) connector D-11 and radio with
CD player connector B-13.
|
|
Q.
Are harness connectors D-11 and B-13 in good condition?
Go to Step 13.
Repair or replace the damage component(s).
|
|
|
STEP 13. Check the wiring harness between tweeter (RH) connector D-11
(terminals 1 and 2) and radio with CD player connector B-13 (terminals 14 and 6).
|
|
- Check the communication lines for open circuit and short circuit.
|
|
| note |
Prior to the wiring harness inspection, check intermediate connector B-104 <LH
drive vehicles> or B-120 <RH drive vehicles>, and repair if necessary.
|
Q.
Is the wiring harness between tweeter (RH) connector D-11 (terminals 1 and 2) and
radio with CD player connector B-13 (terminals 14 and 6) in good condition?
Replace the radio with CD player.
Repair replace the damage component(s).
|
|
|
STEP 14. Check the rear speaker (LH).
|
|
|
(1)Remove the rear speaker (LH). Refer to .
|
|
(2)Check that the rear speaker (LH) generates noise when a five-volt voltage is applied on
the rear speaker (LH) terminal.
Q.
Is the rear speaker (LH) generating noise?
Go to Step 15.
Replace the rear speaker (LH).
|
|
|
STEP 15. Connector check: Rear speaker (LH) connector C-38 and radio
with CD player connector B-13.
|
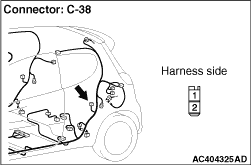
|
Q.
Are harness connectors C-38 and B-13 in good condition?
Go to Step 16.
Repair or replace the damage component(s).
|
|
|
STEP 16. Check the wiring harness between rear speaker (LH) connector
C-38 (terminals 1 and 2) and radio with CD player connector B-13 (terminals 2 and 8).
|
|
- Check the communication lines for open circuit and short circuit.
Q.
Is the wiring harness between rear speaker (LH) connector C-38 (terminals 1 and 2)
and radio with CD player connector B-13 (terminals 2 and 8) in good condition?
Repair or replace the radio with CD player.
Repair the wiring harness.
|
|
|
STEP 17. Check the rear speaker (RH).
|
|
|
(1)Remove the rear speaker (RH). Refer to .
|
|
(2)Check that the rear speaker (RH) generates noise when a five-volt voltage is applied on
the rear speaker (RH) terminal.
Q.
Is the rear speaker (RH) generating noise?
Go to Step 18.
Replace the rear speaker (RH).
|
|
|
STEP 18. Connector check: Rear speaker (RH) connector C-35 and radio
with CD player connector B-13.
|
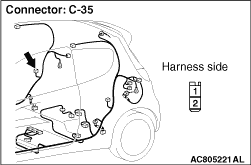
|
Q.
Are harness connectors C-35 and B-13 in good condition?
Go to Step 19.
Repair or replace the damage component(s).
|
|
|
STEP 19. Check the wiring harness between rear speaker (RH) connector
C-35 (terminals 1 and 2) and radio with CD player connector B-13 (terminals 1 and 7).
|
|
- Check the communication lines for open circuit and short circuit.
Q.
Is the wiring harness between rear speaker (RH) connector C-35 (terminals 1 and 2)
and radio with CD player connector B-13 (terminals 1 and 7) in good condition?
Repair or replace the radio with CD player.
Repair or replace the damage component(s).
|
)
)
)
)
)
)
)
)
)
)
)
)
)
)
)
)
)
)
)