Code No.B1201: Trouble of fuel information

COMMENTS ON TROUBLE SYMPTOM
If only the fuel gauge does not operate, the fuel tank pump and gauge unit, combination meter, wiring harness or connector(s) may be defective.
PROBABLE CAUSES
- Damaged harness wires and connectors
- Malfunction of fuel tank gauge unit
- Malfunction of fuel tank pump and gauge unit
- Malfunction of combination meter
|
|
STEP 1. Connector check: fuel tank pump and gauge unit connector C-13.
|

|
Q.
Is fuel tank pump and gauge unit connector C-13 in good condition?
 Go to Step 2. Go to Step 2.
 Repair the connector, and then go to Step 8. Repair the connector, and then go to Step 8.
|
|
|
STEP 2. Check the fuel gauge circuit.
|
|
(1)Disconnect fuel tank pump and gauge unit connector C-13.
|
|
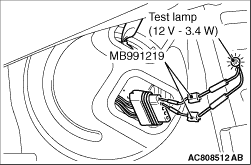
(2)Use special tool MB991219 to connect a test lamp (12 V - 3.4 W) between the wiring harness connector terminals 4 and 5.
(3)Turn the Ignition switch to "ON" position.
(4)Check if the test lamp illuminates.
OK: Illuminates
Q.
Is the check result satisfactory?
Go to Step 6.
Go to Step 3.
|
|
|
STEP 3. Resistance measurement at fuel tank pump and gauge unit connector C-13 to body earth.
|
|
(1)Disconnect fuel tank pump and gauge unit connector C-13, and measure at the wiring harness side.
|

|
(2)Measure the resistance value between terminal 4 and earth.
OK: Continuity exists (2 Ω or less)
Q.
Is the check result normal?
Go to Step 5.
Go to Step 4.
|
|
|
STEP 4. Check the wiring harness between fuel tank pump and gauge unit connector C-13 (terminal 4) and earth.
|
|
- Check the earth wires for open circuit.
Q.
Is the wiring harness between fuel tank pump and gauge unit connector C-13 (terminal 4) and earth in good condition?
Go to Step 8.
Repair the harness, and then go to Step 8.
|
|
|
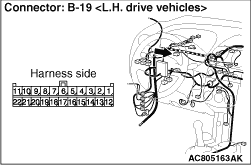
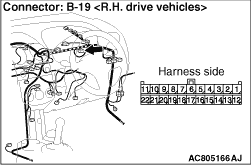
STEP 5. Check the wiring harness between combination meter connector B-19 (terminal 17) and fuel gauge unit connector C-13 (terminal 5).
|
|
- Check the input line for open or short circuit.
Q.
Is the wiring harness between combination meter connector B-19 (terminal17) and fuel gauge unit connector C-13 (terminal 5) in good condition?
Go to Step 7.
Repair the harness, and then go to Step 7.
|
|
|
STEP 6. M.U.T.-III data list
|
|
|
Item 07: Fuel gauge (target value)
|
|
|
OK: Fuel gauge and M.U.T.-III displayed values agree with each other.
|
|
|
Q.
Is the check result normal?
|
|
|
Go to Step 8.
|
|
|
|
|
|
Go to Step 7.
|
|
|
|
|
|
STEP 7. Check whether the diagnosis code is reset.
|
|
|
Recheck if the diagnosis code is set.
|
|
|
(1)Erase the diagnosis code.
|
|
|
(2)Turn the ignition switch to "ON" position.
|
|
|
(3)Check if the diagnosis code is set.
|
|
|
Q.
Is the diagnosis code set?
|
|
|
Replace fuel tank pump and gauge unit and then go to Step 8.
|
|
|
|
|
|
The procedure is complete.
|
|
|
|
|
|
STEP 8. Check whether the diagnosis code is reset.
|
|
|
Recheck if the diagnosis code is set.
|
|
|
(1)Erase the diagnosis code.
|
|
|
(2)Turn the ignition switch to "ON" position.
|
|
|
(3)Check if the diagnosis code is set.
|
|
|
Q.
Is the diagnosis code set?
|
|
|
After the combination meter is replaced, then perform the variant coding (Refer to GROUP 00, Precautions Before Service - How to Perform Variant Coding  ). ).
|
|
|
|
|
|
The procedure is complete.
|
|
|
|
)
)
)
)
)
)