REMOVAL AND INSTALLATION


warning
  • Never attempt to disassemble or repair the seat belt pre-tensioner. If faulty, replace it.
  • Be extremely careful when handling the seat with pre-tensioner. Do not subject it to shocks, drop it, bring it close to strong magnets or allow contact with water, grease or oil. Always replace it with a new part if any dents, cracks or deformation is found.
  • Do not place anything on top of the seat belt pre-tensioner.
  • Do not expose the seat belt pre-tensioner to temperatures over 90°C.
  • After operating the seat belt pre-tensioner, replace the seat belt pre-tensioner with a new part.
  • Gloves and protective goggles should be worn when handling a seat belt pre-tensioner once it has been used.
  • If disposing of a seat belt with pre-tensioner which has not yet been operated, its seat belt pre-tensioner should be operated first before disposal (Refer to ).

<COLT>


Pre-removal Operation
  • Turn the ignition key to the "LOCK" (OFF) position.
  • Disconnect the Negative Battery Terminal.


Removal steps


1.
Sash guide cover


2.
Seat belt shoulder anchor bolt


3.
Seat belt lower anchor bolt


·
Lower centre pillar trim (Refer to GROUP 52A, Trims ).
<<A>>

4.
Seat belt pre-tensioner connector connection


5.
Seat belt with pre-tensioner


Installation steps

>>A<<
·
Pre-installation inspection


5.
Seat belt with pre-tensioner

>>B<<
4.
Seat belt pre-tensioner connector connection


·
Lower centre pillar trim (Refer to GROUP 52A, Trims ).


3.
Seat belt lower anchor bolt


2.
Seat belt shoulder anchor bolt


1.
Sash guide cover


·
Negative battery cable connection

>>C<<
·
Post-installation inspection
note The figure shows the seat belt with pre-tensioner (RH).

<COLT CZ3>


Pre-removal Operation
  • Turn the ignition key to the "LOCK" (OFF) position.
  • Disconnect the Negative Battery Terminal.


Removal steps


1.
Sash guide cover


2.
Seat belt shoulder anchor bolt


3.
Cap


4.
Seat belt lower anchor bolt


·
Lower quarter trim (Refer to GROUP 52A, Trims ).
<<A>>

5.
Seat belt pre-tensioner connector connection


6.
Seat belt with pre-tensioner


Installation steps

>>A<<
·
Pre-installation inspection


6.
Seat belt with pre-tensioner

>>B<<
5.
Seat belt pre-tensioner connector connection


·
Lower quarter trim (Refer to GROUP 52A, Trims ).


4.
Seat belt lower anchor bolt


3.
Cap


2.
Seat belt shoulder anchor bolt


1.
Sash guide cover


·
Negative battery cable connection

>>C<<
·
Post-installation inspection
note The figure shows the seat belt with pre-tensioner (RH).

REMOVAL SERVICE POINTS


<<A>> SEAT BELT PRE-TENSIONER CONNECTOR DISCONNECTION


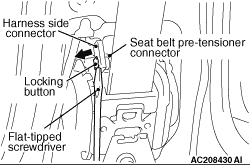
1.Use a flat-tipped screwdriver to pull out forward and unlock the locking button of the harness side connector.
2.Disconnect the seat belt pre-tensioner harness side connector.

INSTALLATION SERVICE POINTS


>>A<< PRE-INSTALLATION INSPECTION


1.
warning When discarding the seat belt with pre-tensioner, operate the pre-tensioner as specified in the service procedure (Refer to ).
Even new seat belt with pre-tensioner require inspection before installation.
2.Connect the negative battery cable.

3.
caution 
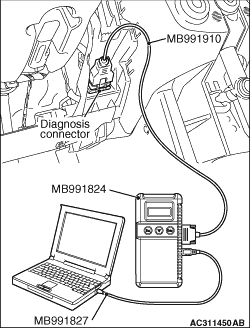
To prevent damage to M.U.T.-III, always turn the ignition, switch to the “LOCK” (OFF) position before connecting or disconnecting M.U.T.-III.
Connect M.U.T.-III to the diagnosis connector.
4.Turn the ignition switch to the ON position.
5.Check diagnosis codes using M.U.T.-III to ensure that the SRS operates properly.
At this time, check that no diagnosis code except B1460 and B1470 are set.
6.
danger Wait at least 60 seconds after the disconnection of the battery cable before any further job (Refer to ).
Disconnect the negative battery cable and insulate with tape.

>>B<< PRE-TENSIONER CONNECTOR CONNECTION


Connect the pretensioner connector then securely lock the locking button of the harness-side connector.

>> C<< POST-INSTALLATION INSPECTION


1.Connect the negative battery cable.
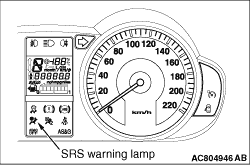
2.Turn the ignition key to "ON" position.

3.Does the "SRS" warning lamp illuminate for approximately seven seconds, and go out?
4.If no, refer to troubleshooting (Refer to ).