|
|
1.In order to protect the body side, apply protection tape to adjacent body areas around the installed side air dam.
|
|
|
2.Remove the side air dam attaching clips.
|
|
|
3.
| caution |
Do not allow the piano wire to contact the side sill on the body side.
|
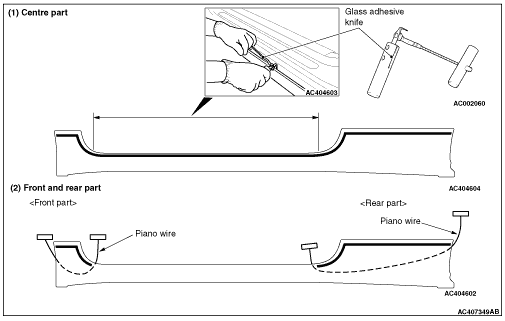
Using a piano wire and glass adhesive knife, cut off the side air dam adhesive as shown in the illustration.
(1)
First, cut off centre part of the adhesive by using a glass adhesive knife.
(2)
Next, cut off front and rear parts of the adhesive by using a piano wire.
|
|
|
4. Remove the side air dam.
|
|
|
5.
| caution |
- Be careful not to remove more adhesive than is necessary.
- Be careful not to damage a paintwork on the body surface with the knife. If a paintwork is damaged, repair the damaged area with repair paint or anti-rust agent.
|
|
|
|
6. Use a knife to cut away the remaining adhesive on body side uniformly so that the adhesive thickness is within 2 mm.
|
|
|
7. When re-using the side air dam, use a knife to cut away the remaining adhesive on the side air dam uniformly so that the adhesive thickness is within 2 mm.
|
|
|
1.<When using a new side air dam.>
| caution |
Leave the degreased parts for 3 or more minutes to dry well, before starting on the next step. Do not touch the degreased parts.
|
(1)
Use Parts Cleaner (MZ100387 or equivalent) to degrease the side air dam.
(2)
Apply the primer and adhesive.
(3)
Install the side air dam by the same procedure as for the windshield (Refer to GROUP 42, WINDSHIELD INSTALLATION  ). ).
|
|
|
1.<When re-using the side air dam.>
| caution |
Leave the degreased parts for 3 or more minutes to dry well, before starting on the next step. Do not touch the degreased parts.
|
(1)
Use Parts Cleaner (MZ100387 or equivalent) to degrease the side air dam.
(2)
Apply the adhesive.
(3)
Install the side air dam.
|
)
)
)