REMOVAL AND INSTALLATION <COLT CZ3>


caution
  • Do not disassemble or throw the tailgate gas spring into fire.
  • Punch a hole in the gas spring before disposal to release the gas inside.
  • Ensure the tailgate gas spring piston rod does not come into contact with foreign material.
Pre-removal Operation
  • High-mounted Stop Lamp Assembly Removal (Refer to GROUP 54A, High-mounted Stop Lamp ).
  • Tailgate Spoiler Removal <Vehicles with tailgate spoiler> (Refer to GROUP 51, Tailgate Spoiler ).
  • Tailgate Trim Bracket Removal (Refer to GROUP 52A, Tailgate Trim ).
  • Rear Wiper Motor and Rear Washer Hose Removal (Refer to GROUP 51, Rear Wiper and Washer ).

Post-installation Operation
  • Tailgate Fit Adjustment (Refer to ).
  • Adjustment of Tailgate Height (Refer to ).
  • Rear Wiper Motor and Rear Washer Hose Installation (Refer to GROUP 51, Rear Wiper and Washer ).
  • Tailgate Trim Bracket Installation (Refer to GROUP 52A, Tailgate Trim ).
  • Tailgate Spoiler Installation <Vehicles with tailgate spoiler> (Refer to GROUP 51, Tailgate Spoiler ).
  • High-mounted Stop Lamp Assembly Installation (Refer to GROUP 54A, High-mounted Stop Lamp ).


Tailgate assembly removal steps


1.
Damper


2.
Tailgate wiring harness
<<A>>

3.
Tailgate gas spring


4.
Rear shelf hook
<<B>>

5.
Instrument panel wiring harness


6.
Tailgate assembly


·
Headlining assembly (Refer to GROUP 52A, Headlining .)

>>B<<
7.
Tailgate hinge


Tailgate opening weatherstrip removal

>>A<<
8.
Tailgate opening weatherstrip

REMOVAL SERVICE POINTS


<<A>> TAILGATE GAS SPRING REMOVAL


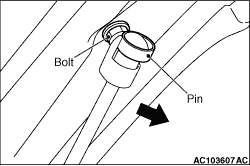
As shown in the Figure, slide the pin upward, then remove the tailgate gas spring in the direction of the arrow to unscrew the bolt.

<<B>> INSTRUMENT PANEL WIRING HARNESS REMOVAL


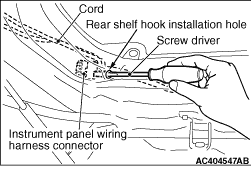
When the instrument panel wiring harness is removed from the tailgate, the instrument panel wiring harness connector is caught in around the rear shelf hook. When removing the instrument panel wiring harness, insert a screw driver into the rear shelf hook installation hole to release the connector.

INSTALLATION SERVICE POINTS


>>A<< TAILGATE OPENING WEATHERSTRIP INSTALLATION


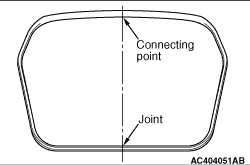
  • Assemble so the tailgate opening weatherstrip connection is at the centre of the body.
  • Install the tailgate opening watherstrip so that the clearance of the joint as shown should be 1 mm or less.

>>B<< TAILGATE HINGE INSTALLATION


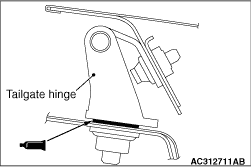
Apply the specified sealing agent to the tailgate hinge assembly surface to assembly the tailgate hinge.
Specified Adhesive: 3M ATD Part No.8531 Heavy drip check sealer, 3M ATD Part No.8646 Automotive joint and seam sealer or equivalent