REMOVAL AND INSTALLATION <COLT CZ3>


Waterproof film removal steps


·
Door trim assembly (Refer to GROUP 52A, Door Trim .)


·
Speaker (Refer to GROUP 54A, Speaker .)


·
Door inside handle (Refer to .)

>>C<<
1.
Waterproof film


Door opening weatherstrip inner removal steps


·
Cowl side trim and scuff plate (Refer to GROUP 52A, Interior Trim .)

>>B<<
2.
Door opening weatherstrip inner


3.
Seal pad


Door opening weatherstrip outer removal steps
<<A>>

4.
Door opening weatherstrip outer upper
<<A>>

5.
Door opening weatherstrip outer lower <Vehicles with Door opening weatherstrip outer lower>


Door beltline weatherstrip inner removal steps


·
Door trim assembly (Refer to GROUP 52A, Door Trim .)


6.
Door beltline weatherstrip inner


Door beltline moulding removal steps


·
Door mirror assembly (Refer to GROUP 51, Door Mirror .)


7.
Door beltline moulding
<<B>>
>>A<<
8.
Rivet


9.
Clip


Door window glass runchannel removal


10.
Door window glass runchannel

REMOVAL SERVICE POINTS


<<A>> DOOR OPENING WEATHERSTRIP OUTER LOWER AND DOOR OPENING WEATHERSTRIP OUTER UPPER REMOVAL


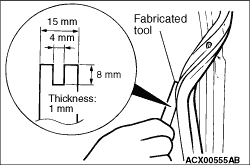
Make a fabricated tool as shown in the illustration to remove the door opening weatherstrip outer.

<<B>> RIVET REMOVAL


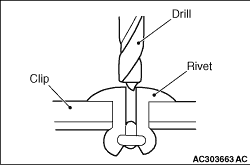
Use a drill (4.0 mm) to make a hole in the rivet to break it, and then remove the rivet.

INSTALLATION SERVICE POINTS


>>A<< RIVET INSTALLATION


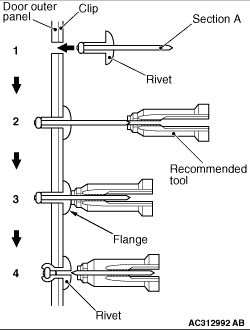
Use recommended tool shown in the illustration to connect the rivet by the following procedure.

1.Insert the rivet into the base material (door outer panel and clip).
2.Place the recommended tool over section A of the rivet.
3.While pushing the flange surface of the rivet with the recommended tool, press the handle of the tool.
4.The thin part of section A of the rivet will break and the rivet will then be attached.

>>B<< DOOR OPENING WATHERSTRIP INNER INSTALLATION


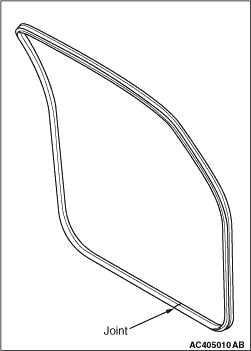
Install door opening weatherstrip inner so that the clearance of the joint as shown should be 1 mm or less.

>>C<< WATERPROOF FILM INSTALLATION


caution 
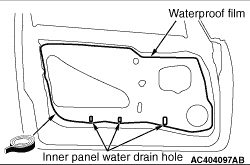
When sticking the waterproof film, ensure that the sealant is applied under the inner panel water drain hole.
Apply the specified adhesive to the waterproof film as shown and stick the film.
Specified sealant: 3M ATD Part No.8625 or equivalent