|
|
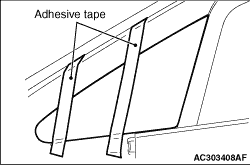
1.In order to protect the body (paint surface), apply adhesive tape to all body areas around the installed delta window glass.
|
|
2.Apply adhesive tape to avoid the delta window glass from dropping.
3.Using a sharp-point drill, make hole in the delta window glass adhesive.
|
|
4.
| caution |
Do not let the piano wire touch the edge of the delta window glass.
|
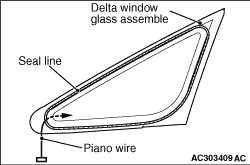
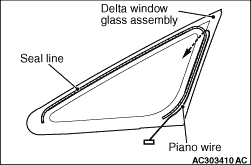
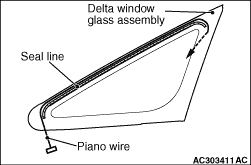
Cut off the delta window glass adhesive according to the procedures shown below:
(1)
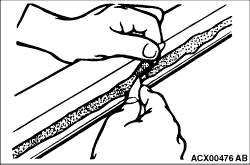
To remove the adhesive from the bottom of the delta window glass, feed a piano wire into the passenger compartment through the hole, and then cut off the adhesive seal line by pulling the piano wire alternately from the inside and outside of the vehicle.
(2)
To remove the adhesive from the rear of the delta window glass, feed a piano wire into the passenger compartment through the hole, and then cut off the adhesive seal line by pulling the piano wire alternately from the inside and outside of the vehicle.
(3)
To remove the adhesive from the front of the delta window glass, feed a piano wire into the passenger compartment through the hole, and then cut off the adhesive seal line by pulling the piano wire alternately from the inside and outside of the vehicle.
|
|
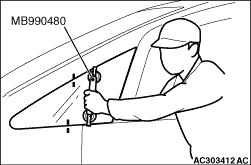
5.Make mating marks on the delta window glass and body, and use the special tool (window glass holder, MB990480) to remove the delta window glass.
|
|
6.
| caution |
- Be careful not to remove more adhesive than is necessary.
- Be careful not to damage the paintwork on the body surface with the knife. If the paintwork is damaged, repair the damaged area with repair paint or anti-rust agent.
|
Use a knife to cut away the remaining adhesive so that the thickness is within 2 mm around the entire circumference of the body flange.
7.Finish the flange surfaces so that they are smooth.
8.If the delta window glass is reused, scrape away all traces of old adhesive from the glass.
|
|
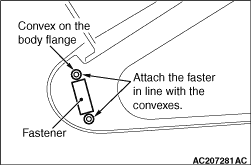
1.Install the fastener to the specified positions on the body flange.
2.Install the fastener to the delta window glass at the positions which correspond to the fasteners on the body flange.
|
|
1.If the delta window glass is reused, follow the procedures shown below:
(1)
|
|
| caution |
Do not forget gasket.
|
|
Fit clips onto body.
(2)
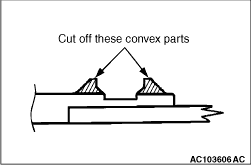
Cut away clip fitting convex on quarter window glass.
|
|
| note |
Convex gets broken when quarter window glass is removed.
|
|
2.
| caution |
Leave the degreased parts for 3 or more minutes to dry well, before starting on the next step. Do not touch the degreased parts.
|
Use Parts Cleaner (MZ100387 or equivalent) to degrease the inside and outside of the delta window glass and the body flanges.
3.Apply the primer and adhesive.
4.Install the delta window glass by the same procedure as for the windshield (Refer to  ). ).
|
)
)
)
)
)
)
)
)
)