|
|
2.Inspect the ball joint for looseness in the axial direction while shaking the tie-rod
end vertically. If there is looseness, replace the tie-rod end assembly (Refer to  ). ).
|
|
1.
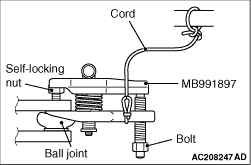
| caution |
- Do not remove the tie rod end nut from the ball joint. Loosen
it and use special tool to avoid possible damage to the ball joint threads.
- Hang special tool with cord to prevent it from falling.
|
Install special tool ball joint remover (MB991897) as shown in the figure.
|
|
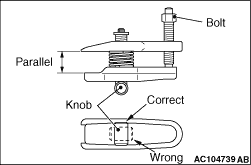
2.Turn the bolt and knob to make the special tool insert horizontal, then hand-tighten the
bolt. After tightening, verify that the insert is still horizontal.
| note |
When adjusting the special tool wedge horizontally, move the knob to the position shown
in the figure so that it functions as a fulcrum of the insert.
|
3.Turn the bolt and disconnect the tie-rod end from the steering knuckle.
|
|
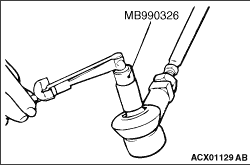
4.Move the ball joint stud several times and install the nut on the stud. Using special
tool preload socket (MB990326), measure the ball joint turning torque.
Standard value: 10 N·m or less
5.If the turning torque exceeds the standard value, replace the tie rod end (Refer to ).
6.If the turning torque is under the standard value, check the ball joint for axial
play or ratcheting. If no axial play or ratcheting, the ball joint can be re-used.
7.
| caution |
Always use a new ball joint nut as it is a self-locking
nut.
|
Install the tie rod end to the knuckle, then tighten a new self-locking nut to the specified
torque.
Tightening torque: 43 ± 7 N·m
|
)
)
)