|
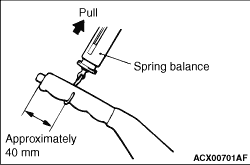
Attach the spring balance to the centre of the parking brake lever grip. Then, check that
the stroke is within the standard value when the parking brake lever is pulled to the vertical
direction of the lever with a force of approximately 200 N.
Standard value: 5 - 7 notches
|
|
|
If the parking brake lever stroke is out of the standard range, adjust as described below:
|
|
|
1.Remove the rear cup holder (Refer to GROUP 52A - Floor Console Assembly  ). ).
|
|
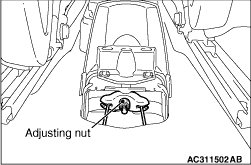
2.Loosen the adjusting nut to the end of the cable rod in order to allow slack in the cables.
3.For vehicles with rear drum brakes, with the engine idling, forcefully depress the
brake pedal five or six times and confirm that the pedal stroke stops changing.
| note |
If the pedal stroke stops changing, the automatic-adjustment mechanism is functioning
normally, and the clearance between the shoe and drum is correct.
|
|
|
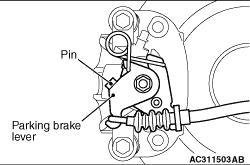
4.For vehicles with rear disc brakes, check that the parking brake lever on the caliper
side is touching the parking brake lever bracket.
| note |
If the parking brake lever is not touching the parking brake lever bracket, the parking
brake cable might be stuck or routed incorrectly, or there might be a problem with the automatic
adjustment mechanism inside the rear brake calipers. Therefore, it is necessary to check the
parking brake cable and to disassemble and inspect the rear brake calipers.
|
5.
| caution |
Be careful that the parking brake lever notch number should be within
the standard range. If the notch number is too low, rear brake dragging can be caused.
|
Adjust the parking brake lever stroke to the standard value by turning the adjusting nut.
After adjustment, check that there is no free play between the adjusting nut and the parking
brake lever.
6.After the parking brake lever stroke is adjusted, raise the rear of the vehicle. Release
the parking brake, and turn the rear wheels to confirm that the rear brakes are not dragging.
7.Install the rear cup holder (Refer to GROUP 52A - Floor Console Assembly ).
|
)
)
)