|
1.
| caution |
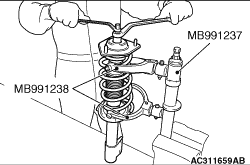
- Install special tool arm set (MB991238)
evenly, and so that the maximum length will be attained within the installation range.
- Do not use an impact wrench to tighten the bolt of special tool spring compressor
body (MB991237), otherwise the special tool will break.
|
Use following special tools to compress the coil spring.
- Spring compressor body (MB991237)
- Arm set (MB991238)
|
|
2.
| warning |
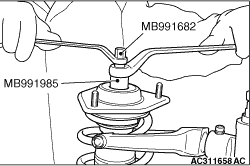
Do not use an impact wrench to remove the self-locking nut. Vibration
of the impact wrench will cause special tools (MB991237 and MB991238) to slip and cause personal
injury.
|
Use following special tools to secure the strut, and then remove the self-locking nut.
- Wrench (MB991985)
- Socket (MB991682)
|
|
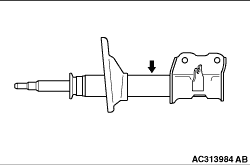
The gas must be discharged from the strut assembly before discarding it. Place the strut
assembly horizontally with its piston rod extended. Then drill a hole of approximately 3 mm
in diameter at the location shown in the illustration and discharge the gas.
|
|
|
1.Ensure that the bearing is seated correctly.
|
|
2.
| caution |
Do not use an impact wrench to tighten the bolt of special tool spring
compressor body (MB991237), otherwise the special tool will break.
|
Install following special tools to the strut assembly same as its removal.
- Spring compressor body (MB991237)
- Arm set (MB991238)
3.While the coil spring is being compressed by the special tools, temporarily tighten
the self-locking nut.
|

|
4.The upper spring seat is positioned against the strut assembly as shown.
| note |
Using a rod as shown facilitates the alignment.
|
5.Align both ends of the coil spring with the grooves in the spring seat, and then loosen
the special tools.
|
|
6.
| caution |
Do not use an impact wrench to tighten the self-locking nut, otherwise
the self-locking nut will be damaged.
|
Using following special tools, tighten the self-locking nut to 60 ± 10 N·m.
- Wrench (MB991985)
- Socket (MB991682)
|
)

)
)
)
)