|
|
1.With the hose installed, remove the A/C compressor assembly from the cylinder
block (Refer to GROUP 55B, Compressor Assembly  ). ).
|
|
|
2.Secure the removed A/C compressor assembly with a cord to a place where it
will not be a hindrance when removing the crank angle sensor.
|
|
|
1.Remove sealant from the crank angle sensor and the cylinder block surfaces.
|
|
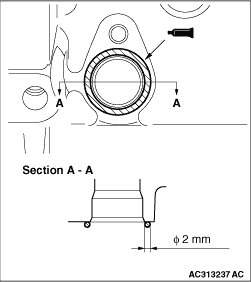
2.Apply the sealant to the cylinder block mounting surface as shown, and install the crank
angle sensor to the cylinder block.
Specified sealant:
<134, 135> LOCTITE 5971 or equivalent
<3A9, 4A9> ThreeBond 1207F or equivalent
| note |
Install the crank angle sensor immediately after applying sealant.
|
3.
| caution |
After the installation, until a sufficient period of time (one hour or
more) elapses, do not apply the oil or water to the sealant application area or start the engine.
|
Tighten the crank angle sensor mounting bolt to the specified torque.
Tightening torque:
<134, 135> 8.4 ± 0.6 N·m
<3A9, 4A9> 9.5 ± 2.5 N·m
|
)
)
)