REMOVAL AND INSTALLATION <Except for 4G1>


Post-installation Operation
  • Drive Belt Tension Check and Adjustment (Refer to GROUP 11A, On-Vehicle Service - Drive Belt Tension Check and Adjustment ) <134, 3A9>.
  • Drive Belt Tension Check and Adjustment (Refer to GROUP 11C, On-Vehicle Service - Drive Belt Tension Check and Adjustment ) <135, 4A9>.


Removal steps


·
Front bumper clip (Refer to GROUP 11A, Crankshaft Pulley ).
<<A>>

1.
Drive Belt


2.
Alternator connector connection


3.
Alternator terminal connection
<<B>>
>>B<<
4.
Alternator pivot bolt
<<C>>

5.
Alternator assembly <134>
<<D>>
>>A<<
6.
Alternator assembly <135>

REMOVAL SERVICE POINTS


<<A>> DRIVE BELT REMOVAL


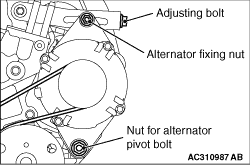
1.Loosen the nut for alternator pivot bolt and alternator fixing nut.
2.
caution To reuse the drive belt, draw an arrow indicating the rotating direction (clockwise) on the back of the belt using chalk, etc.
Turn the adjusting bolt in the anti-clockwise direction (to the left) to remove the drive belt.

<<B>> ALTERNATOR PIVOT BOLT REMOVAL


Slide the clamp on the lower radiator hose, and then remove the alternator pivot bolt.

<<C>> ALTERNATOR ASSEMBLY <134, 3A9> REMOVAL


Remove the alternator assembly from above the vehicle.

<<D>> ALTERNATOR ASSEMBLY <135, 4A9> REMOVAL


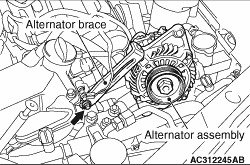
Loosen the bolt indicated by an arrow and move the alternator brace upward. Then lift the alternator assembly and remove it.

INSTALLATION SERVICE POINTS


>>A<< ALTERNATOR ASSEMBLY <135, 4A9> INSTALLATION


After installing the alternator, tighten the bolt indicated by an arrow to the specified torque.
Tightening torque: 36 ± 3 N·m

>>B<< ALTERNATOR PIVOT BOLT INSTALLATION


Install the alternator pivot bolt and then reposition the lower radiator hose clamp in its original position.