|
| caution |
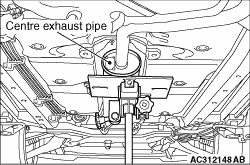
Before removing the exhaust main muffler, be sure to support the centre exhaust pipe with
a transmission jack to avoid damage to oxygen sensor wiring.
|
|
|
|
1.
| caution |
- Do not pull the oxygen sensor harness from underneath the
vehicle because the tape securing the vehicle-side oxygen sensor connector may be broken.
- Do not remove the tape securing the vehicle-side oxygen sensor connector because
it may cause abnormal sound and water ingress.
|
Remove the front seat assembly (LH) (Refer to GROUP 52A, Front Seat Assembly  ). ).
|
|
|
2.Remove the cowl side trim (LH) and front scuff plate (LH) (Refer to GROUP 52A, Trim ) <COLT>.
|
|
|
3.Remove the cowl side trim (LH) and front scuff plate (LH) (Refer to GROUP 52A, Trim ) <COLT
CZ3>.
|
|
|
4.Remove the floor console (Refer to GROUP 52A, Floor Console ).
|
|
|
5.Turn over the floor mat and disconnect the oxygen sensor connector.
|
|
|
6.Remove the grommet through the service hole and take the oxygen sensor harness out
of the vehicle.
|
|
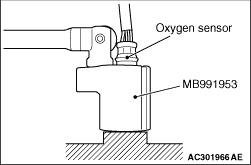
7.Use special tool oxygen sensor wrench (MB991953) to remove the oxygen sensor.
|
|
|
1.Remove the console side cover (RH) (Refer to GROUP 52A, Floor Console ).
|
|
|
2.Turn over the floor mat and disconnect the oxygen sensor connector.
|
|
|
3.Remove the grommet through the service hole and take the oxygen sensor harness out
of the vehicle.
|
|
4.Use special tool oxygen sensor wrench (MB991953) to remove the oxygen sensor.
|
|
1.Tighten the oxygen sensor to the specified torque by using special tool oxygen sensor
wrench (MB991953).
Tightening torque: 50 ± 10 N·m
2.Route the oxygen sensor harness through the service hole into the vehicle, and install
the grommet.
3.Connect the oxygen sensor connector and return the floor mat to the original state.
4.Install the console side cover (RH) (Refer to GROUP 52A, Floor Console ).
|
|
1.Tighten the oxygen sensor to the specified torque by using special tool oxygen sensor
wrench (MB991953).
Tightening torque: 50 ± 10 N·m
2.Route the oxygen sensor harness through the service hole into the vehicle, and install
the grommet.
3.Connect the oxygen sensor connector and return the floor mat to the original state.
4.Install the floor console (Refer to GROUP 52A, Floor Console ).
5.Install the cowl side trim (LH) and front scuff plate (LH) (Refer to GROUP 52A, Trim ) <COLT>.
6.Install the cowl side trim (LH) and front scuff plate (LH) (Refer to GROUP 52A, Trim ) <COLT
CZ3>.
7.Install the front seat assembly (LH) (Refer to GROUP 52A, Front Seat Assembly ).
|
)
)
)
)