|
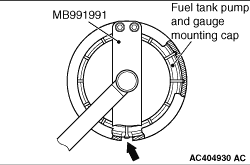
Install special tool fuel tank cap wrench (MB991991) as shown in the figure, and remove
the fuel tank pump and gauge mounting cap.
| note |
Align the notch on the special tool (MB991991) and the thick rib on the fuel tank pump
and gauge mounting cap, and install the special tool (MB991991) to the fuel tank pump and gauge
mounting cap.
|
|
|
1.Install special tool fuel tank cap wrench (MB991991) as shown in the figure.
| note |
Align the notch on the special tool (MB991991) and the thick rib on the fuel tank pump
and gauge mounting cap, and install the special tool (MB991991) to the fuel tank pump and gauge
mounting cap.
|
|
|
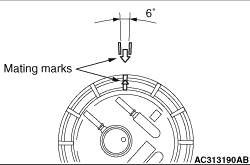
2.Align the mating marks in the following procedure.
(1)
Tighten the fuel tank pump and gauge mounting cap to align the mating marks.
(2)
Use a torque wrench to ensure that the fuel tank pump and gauge mounting cap is tightened
to 60 N·m or more.
(3)
Remove special tool (MB991991), and check that the mark on the fuel tank pump and
gauge mounting cap is within the area shown.
|
|
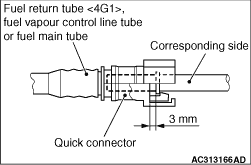
| caution |
After connecting the fuel return tube <4G1>, fuel vapour control line
tube or fuel main tube, slightly pull it to ensure that it is installed securely. Also confirm
that there is a play approximately 3 mm.
|
|
)

)
)
)