|
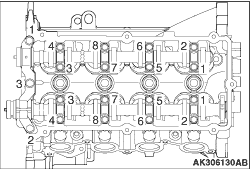
In accordance with the numerical order shown in the illustration, remove
the front camshaft bearing cap first, and then remove the installation bolt of each camshaft
bearing cap.
|
|
|
To facilitate reassembly, attach a tag to each valve tappet removed that
shows where it has been assembled.
|
|
|
Reassemble each valve tappet to the correct location shown on the tag.
|
|
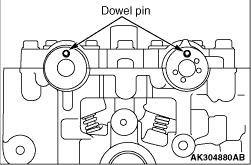
1.Install each camshaft, ensuring that the dowel pin faces the illustrated direction.
|
|
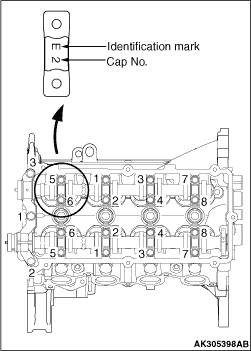
2.The No. 2 to No. 5 bearing caps are equally shaped for both the intake and exhaust camshafts.
Be sure to correctly install them by referring to the identification marks.
Identification mark (stamped on the front and No.
2 to No. 5 bearing caps)
3.In accordance with the numerical order shown in the illustration, tighten each camshaft
bearing cap first and then tighten the front camshaft bearing cap in several steps.
|
|
1.
| caution |
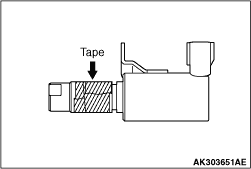
- Do not reuse the O-ring.
- Install the O-ring after wrap a tape not having adhesion (such as
a seal tape) round the notch on the oil passage of OCV to prevent it from damage. The damaged
O-ring may cause oil leakage.
|
Apply a little amount of engine oil to the O-ring of OCV.
2.Install the OCV to the cylinder head.
3.Tighten the OCV to the specified torque of 7.6 ± 0.6 N·m.
|
)

)
)
)
)