|
|
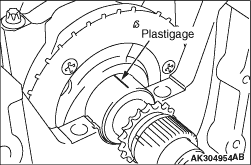
Oil clearance can be measured easily by using "plastigage."
|
|
|
Use the "plastigage" in the following manner.
|
|
|
1.Wipe off oil from the surfaces of the crankshaft journals as well as the inner surfaces
of the bearings.
|
|
|
2.Assemble the crankshaft.
|

|
3.Place a plastigage, with a length equal to the width of the bearing, onto the journals
in the axial direction.
4.Carefully place the main bearing caps, and tighten the bolts to the specified torque.
5.Remove the bolts. Carefully remove the main bearing caps.
|

|
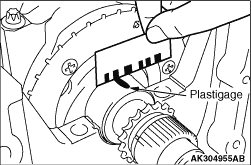
6.Using the measure printed on the plastigage package, measure the width (widest portion)
of the crushed plastigage.
Standard value: 0.014 - 0.034 mm
Limit: 0.1 mm
|
|
|
1.Check visually for scoring, rust, or corrosion. Perform liquid penetrant test etc.
to check for cracks. If faulty, replace.
|
|
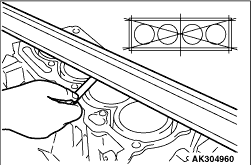
2.Using a straight edge or a thickness gauge, measure the flatness of the cylinder block
top surface. Ensure that no gasket or other foreign matter is attached to the top face.
Standard value: 0.05 mm
Limit: 0.1 mm
3.Check the cylinder bore for scoring or seizure. If faulty, correct (boring) or replace.
|
|
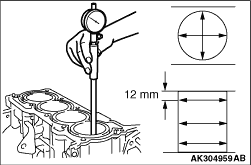
4.Using a cylinder gauge, measure the cylinder bore and centricity. If excessively worn,
bore the cylinder and replace the piston and piston rings.
Standard value:
Inner diameter 75.0 mm
Cylindrically 0.007 mm
|
|
1.Oversize pistons should be based on the largest bore cylinder.
|
|
Size
|
Size mark
|
0.25 mm oversize
|
25
|
|
| note |
The size mark is stamped on the piston top.
|
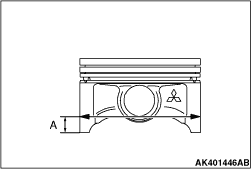
2.In case of 0.25 mm oversized piston, a hole shall be bored through the cylinder block
so that the clearance can have the standard value. The standard measuring point for the outside
piston diameter is at "A" shown in the illustration.
Standard measuring point A:
3.Based on the measured piston outside diameter (O.D.), calculate the boring finish
dimension.
Boring finish dimension = Piston O.D. + 0.015 - 0.035 mm
(Clearance between piston O.D. and cylinder) - 0.02 mm (honing margin)
4.Bore each cylinders to the calculated boring finish dimension.
5.
| caution |
To prevent distortion caused by heat increased during boring,
bore the cylinders in the following order: No.2, No.4, No.1, No.3.
|
Hone the cylinders to the final finish dimension (piston O.D. + piston-to-cylinder
clearance).
6.Check the clearance between the pistons and cylinders.
Standard value: 0.015 - 0.035 mm
| note |
When boring cylinders, finish all of four cylinders to the same oversize. Do not bore
only one cylinder to an oversize.
|
|
