|
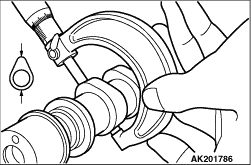
Measure the cam height (nose-to-heel diameter).
If any cam is worn beyond the limit, replace the camshaft.
Standard values:
Intake 35.08 mm
Exhaust 34.26 mm
Limit:
Intake 34.58 mm
Exhaust 33.76 mm
|

|
1.2.Prepare three containers and approximately five liters of diesel fuel. Pour into each
container the diesel fuel in an amount enough for a lash adjuster placed in the container in its
upright position to completely submerge.
|
|
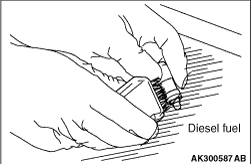
3.Place the lash adjuster in container A and wash its outside surface.
| note |
Use a nylon brush if there are hard-to-remove deposits.
|
|
|
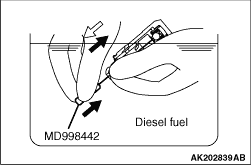
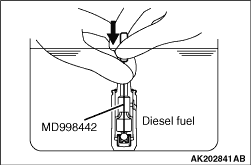
4.
| caution |
The steel ball spring of the lash adjuster is extremely weak.
The lash adjuster’s functionality may be badly affected if the special tool is inserted
too strongly.
|
While gently pushing the internal steel ball using the special tool Air bleed wire (MD998442),
move the plunger in and out 5 - 10 times to eliminate stiffness in the plunger and
expel contaminated oil.
| note |
The plunger must be free from jamming and any other abnormalities. If a defect is found
in plunger operation, replace the lash adjuster.
|
|
|
5.
| caution |
The hole in the side of the lash adjuster must be directed toward
the inside of container A. Never direct it against any person.
|
Take the lash adjuster out of the container, then move the plunger by pushing the steel
ball gently to discharge the diesel fuel from the pressure chamber.
|
|
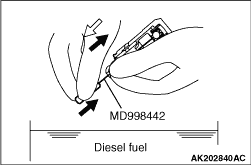
6.
| caution |
The steel ball spring of the lash adjuster is extremely weak.
The lash adjuster’s functionality may be badly affected if the special tool is inserted
too strongly.
|
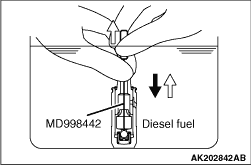
Soak the lash adjuster in the diesel fuel in container B. Move the plunger in and out
5 - 10 times by gently pushing the internal steel ball using the special tool Air bleed
wire (MD998442) until the plunger moves smoothly to wash the lash adjuster’s pressure
chamber.
|
|
7.
| caution |
The hole in the side of the lash adjuster must be directed toward
the inside of container B. Never direct it against any person.
|
Take the lash adjuster out of the container, then move the plunger by pushing the steel
ball gently to discharge the diesel fuel from the pressure chamber.
|
|
8.
| caution |
Do not use container C for cleaning. If cleaning is performed
in container C, foreign matter could enter the pressure chamber when the chamber is filled with
diesel fuel.
|
Soak the lash adjuster in the diesel fuel in container C. Gently push the internal steel
ball using the special tool Air bleed wire (MD998442).
|
|
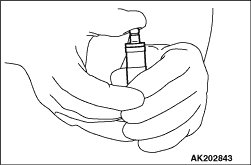
9.Place the lash adjuster upright with the plunger at the top. Push the plunger firmly until
it makes a full stroke, then return the plunger slowly and release the hold of the steel ball
to allow the pressure chamber to be filled with diesel fuel.
|
|
10.Take the lash adjuster out of the container, place it upright with the plunger at the
top, and push the plunger firmly. The plunger must not move at all.
| note |
If the lash adjuster contracts, perform the operations 7 through 9 again. Replace the
lash adjuster if it still contracts even after the pressure chamber has completely been filled
with diesel fuel (air has been bled).
|
11.Keep the serviced lash adjusters in their upright positions to prevent diesel fuel
from spilling out. Protect them from dust or other foreign matter. Install the lash adjusters
onto the engine as soon as possible.
|
)
)
)
)
)
)
)
)