|
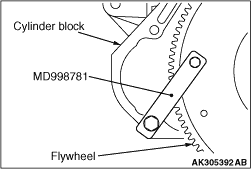
1.Lock the flywheel with the special tool Flywheel stopper (MD998781).
2.Remove the crankshaft bolt.
|
|
1.Lock the flywheel with the special tool Flywheel stopper (MD998781).
|
|
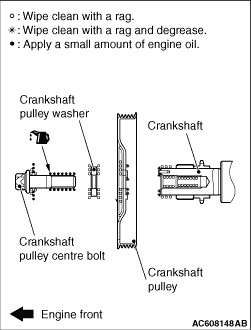
2.Using a rag, wipe dirt on the crankshaft thread hole and the crankshaft pulley washer.
3.Using a rag, wipe dirt on the crankshaft pulley and then degrease the place specified
in the illustration.
| note |
Perform degreasing to prevent the friction resistance from decreasing in the compressed
area due to the residual oil.
|
4.Install the crankshaft pulley.
5.Apply the minimum amount of engine oil to the crankshaft bolt threads and the seating
surface.
6.Turning the inside chamfer side of the crankshaft pulley washer toward the bolt head,
install the crankshaft pulley washer to the crankshaft bolt.
7.Tighten the crankshaft bolt to the specified torque of 50 N·m.
|
|
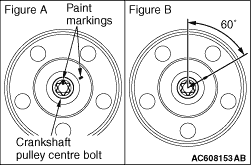
8.As shown in figure A, put a paint mark on one angle of the crankshaft pulley centre bolt.
Then, put a paint mark on the crankshaft damper pulley on the extended line of the angle next
to the marked angle.
9.
| caution |
- Tighten the bolt carefully
as it will not be tightened sufficiently if the tightening angle is less than 60°.
- If the tightening angle exceeds 60°, loosen the bolt completely and repeat
the steps from the start.
|
Tighten the crankshaft pulley centre bolt in a 60 degree angle, and check that the paint
mark on the crankshaft pulley centre bolt aligns with the paint mark on the crankshaft damper
pulley as shown in figure B.
|
)

)
)
)