Strut Install Tutorial
*WARNING*
This tutorial on installing shock/struts with coil-overs is at your own
risk. Me and the GalantSpeed.com staff are not responsible for any
damages or any other abnormal ride qualities you may experience after
installation.
Shock and Strut with Coil-over Installation Tutorial
By: Kevin R. ( -G- )
This tutorial is on installing coil-overs on shock and struts for the
94-98 U.S. Galant. I tried to be as detailed as possible for this
installation. If you are not familiar with your suspension and not
confident on installing I strongly suggest to have a professional
install it. My setup is KYB AGX's with SKUNK2 racing coil-over kit for
the 95-99 Eclipse/Talon. Take note that any aftermarket performance
products will give you a different ride quality from stock. Performance
suspension parts are designed for load and stress for high performance
demands. Don't expect a "soft and luxury" ride....simply you will not
get it with performance suspension parts which are made to improve
handling for the vehicle.
You will need:
-Car Jack
-Car jack stands
-Socket wrench
-Wrench Clamp
-17mm socket
-4mm socket
-Lubricant
-Hammer
-STRUTS-
STRUT REMOVAL
1. Jack up the front of the car and have the car resting on car jacks. Make sure emergency brakes are on.
2. Take off wheels.
3. Open your hood and remove the strut mount nuts with a 4mm socket. If you have a strut bar...its the same procedure.
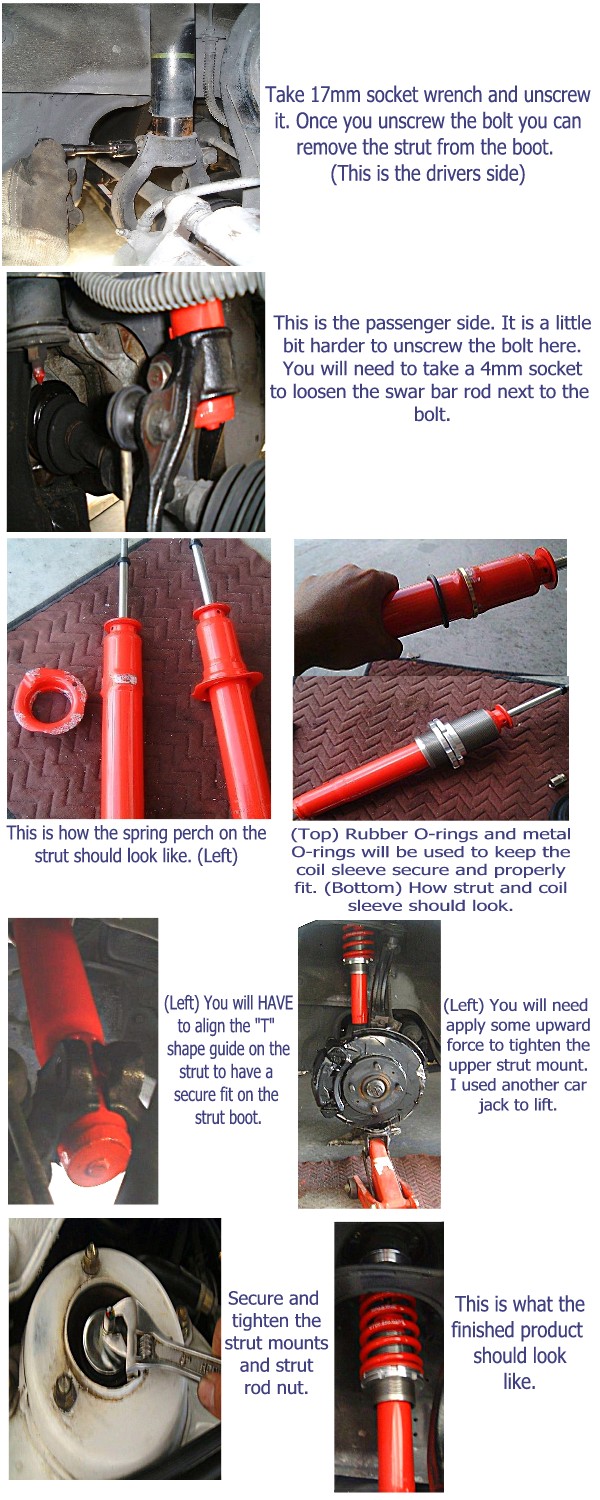
4. DRIVERS SIDE: the bolt is on the left side of the strut boot. Use a
nut wrench with a 17mm socket and remove the bolt. This bolt helps
the boot clamp on the strut.
(NOTE: You could also unbolt where the lower control arm and strut boot
connect..but this is secured highly torqued. This will require a air gun
to remove.)
PASSENGER SIDE: The passenger side strut boot is different and a
little difficult to remove the bolt. The bolt is on the left side still
but the Sway
bar rod is very close to the bolt which makes unscewing the bolt
difficult. Loosen the sway bar rod with 4mm socket and this should give
you some
room to unscrew the strut boot bolt.
5. You will need to apply force downward on the rotor so the boot and
the bottom of the strut will separate. (This will take some time)
6. Once you get the stut out, take a wrench clamp and clamp the very
top of the strut rod. It will have flat ends which will allow you to
clamp
the rod.
7. With the strut rod clamped...take a wrench and remove the nut.
8. Once you loosen the nut, remove all strut mount parts and the bump stop.
COILOVER/STRUT INSTALL
1. You struts should have spring perches....you will have to remove
these perches for proper coilover installation. (NOTE: If you don't
remove these
spring perches, your coil sleeve will be loose and cause damage to the
assembly. Also...you will not achieve stated height adjustment that is
claimed)
2. Make sure you sure the floor is padded with cloth or some other type
of material. Turn strut upside down so its resting on the top of the
strut rod.
3. Take a hammer and cautiously knock off the spring perch. Make sure you don't hit the strut.
4. From here, review your coil-over installation manual for correct installation of the coil sleeve. (Varies with manufacturers)
5. You will NEED to use the factory bump stop...you should cut it in
half and apply it as stated on coil-over installation guide.
6. Reinstall strut mount. (I strongly recommend to purchase new strut mounts...KYB makes them)
7. Once you have the strut mount on....tighten securely. Using the wrench clamp on top of the strut rod....tighten the nut.
8. Lightly lubricate the bottom of the strut.
9. You can either compress the strut to make it shorter so you can
install the strut and place the bottom of the strut into the strut boot.
10. You will notice on the strut there is a little guide on the strut
shaped in a "T". You MUST align this with the strut boot clamp to allow
a secure and proper fit.
11. Securely tighten the strut boot.
12. Apply upward force the the rotor. (I used another car jack for
this) Tighten the strut mounts uptop. (If you have a strut bar..don't
worry about
it right now, this is so when we drop the car the strut assembly is secure.)
13. Drop the car....from here you can do any adjustment to ride height.
If you have a strut bar...go ahead and install it at this point.
-SHOCKS-
SHOCK REMOVAL
1. Remove the rear seats. ( If you have a ES/LS/GS and you have the fold down seats...just fold them down)
2. Remove the shock mount cap.
3. Loosen the shock mount with a 4mm socket.
4. Jack the rear end of the car and lay the car on car jacks.
5. Remove the wheels
6. On the bottom of the shock..remove the bolt with a 17mm socket.
7. You may need to put some downward pressure to the rotor/drum to remove the shock.
COILOVER/SHOCK INSTALLATION
1. With the shocks out, take a wrench clamp and clamp the top of the shock rod.
2. Unscrew the nut from the shock.
3. Remove the whole shock mount and factory bump stop.
4. Your new shocks will have spring perches. Since you are installing
coil-overs, you don't need these spring perches for the same reason the
struts
don't need them.
5. Same procedure as the struts. Turn the shock upside down and cautiously knock off the spring perches. DO NOT hit the shock.
6. From here...refer to your coilover installation guide on coil sleeve installation.
7. You will need to cut the factory bump stop in half.
8. Place springs and shock mounts back. Just reverse the removal steps. (I strongly suggest replacing your shock mounts)
9. Take the wrench clamp and clamp the top of the shock rod. It is flat so you can do this.
10. While rod is clamped....take a wrench and securely tighten the nut.
11. You could either compress the shock or apply downward force the the rotor/drum to install the shock assembly.
12. Make sure the shock is firmly secure to the lower control arm.
13. Bolt on and securely tighten the shock.
[ Go Back ]
7th Generation Galant DIY Copyright © by GalantSpeed.com - (576 reads) |