Do
it yourself motor mount inserts
Stock motor and transmission mounts are designed to serve one basic purpose: to
keep the engine and transmission mounted securely.
This basic how-to is put
together to explain why and how to install a set of your very own homemade
polyethelene motor mount inserts in a FWD 1G DSM, (I'm sure this would work
just as well for other models also.) Although this mod requires some basic
fabrication and time, it’s VERY inexpensive, much cleaner and easier than
filling, and yields excellent results. If you still want to fill around any
open spaces, use 3M Windo Weld, which can be found at most any parts store.
The main purpose is to remove or
reduce wheel hop, improve launch feel, and enhance shift feel and overall
driveability by removing the "play" in the stock motor mounts.
To counteract vibrations
that naturally occur when mounting an engine to a vehicle’s chassis, the stock
mounts are designed with large openings. From a performance standpoint, the
downside of these openings are that they allow the engine to "flop
around" in the engine bay. (especially during spirited driving and
aggressive launches) This movement greatly contributes to wheel hop and poor
shifting feel among other things.
The idea of motor mount
inserts is not a new one. It has been done for a long time. In fact, inserts
made from this same material are sold for some vehicles. However, these inserts
will increase the vibrations transmitted throughout your car especially at
idle. Will this drive you crazy? No. It is a great tradeoff for the enhanced
performance, and after 1,000 miles you’ll probably be used to it. (Special note
to those with 3"exhaust with offroad pipe: you won’t notice a thing ;^)
What you’ll need:
1. A 3/8" thick
polyethelene kitchen cutting board (around $8.00 at Wal-Mart)
2. A wide assortment of
metric sockets and ratchets
3. floor jack and
jackstands
4. jigsaw
5. Dremel or bench grinder
6. bench vise
7. hammer
Procedure:
Since I would
rather not lose sleep over someone improperly removing their motor mounts due
to my incomplete instructions, I will skip directly to making the inserts.
Basically, if you do not know how to change the motor mounts please look
elsewhere (like the factory service manual) for those instructions.
This details the
installation of the inserts in one mount as an example. Repeat the procedure
for the other mounts.
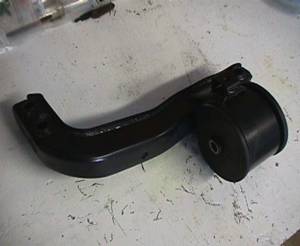
Here's the
driver's side top motor mount, looks fine until…
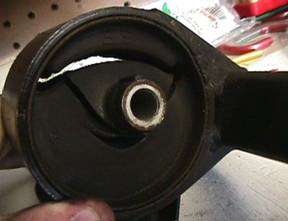
Upon closer inspection,
the mount is badly torn. The large opening in the top doesn't help much either!

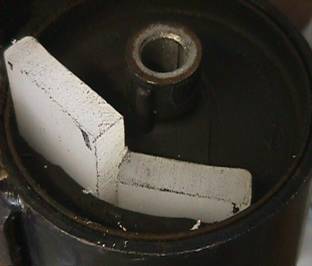
Measure the size of the
openings and cut the cutting board to size. Use the dremel to shape if
necessary.
After cutting and shaping
the polyethelene pieces, insert them into the open areas in the mount. Make
sure it is a very tight fit
A hammer should be used to
pound them into the mount. You may use a bench vise and a little WD-40 helps as
well.
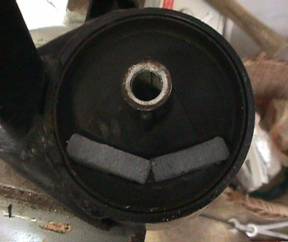
The inserts should look
like this. Flush with the rubber on both sides, filling the gaps completely and
solidifying the mount.
Spray a little flat black
paint on them for a finished look.
Good Luck and enjoy the results! Trust
me, it's worth the effort!