A/C Compressor Replacement

NOTE: Do not install the A/C compressor into a system unless you are completely sure that the system is free of contamination. Installing the A/C compressor into a contaminated system can result in premature A/C compressor failure.
K24Z3 engine model
  1. If the A/C compressor is marginally operable, run the engine at idle speed, and let the air conditioning work for a few minutes, then shut the engine off.
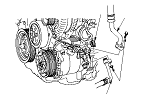
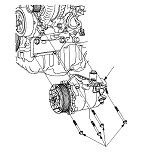
  1. Disconnect the A/C compressor clutch connector (A). Remove the bolts and the nut, then disconnect the suction hose (B) and the discharge hose (C) from the A/C compressor. Plug or cap the lines immediately after disconnecting them to avoid moisture and dust contamination.
  1. Raise the vehicle on a lift, then remove the front splash shield.

  1. Remove the mounting bolts and the A/C compressor (A). Be careful not to damage the radiator fins when removing the compressor.
  1. Install the A/C compressor in the reverse order of removal, and note these items:
    • Inspect the A/C lines for any signs of contamination.
    • Replace the O-rings with new ones at each fitting, and apply a thin coat of refrigerant oil before installing them. Be sure to use the correct O-rings for HFC-134a (R-134a) to avoid leakage.
    • Use refrigerant oil (SP-10) for HFC-134a SANDEN spiral type A/C compressor only.
    • To avoid contamination, do not return the oil to the container once dispensed, and never mix it with other refrigerant oils.
    • Immediately after using the oil, reinstall the cap on the container, and seal it to avoid moisture absorption.
    • Do not spill the refrigerant oil on the vehicle; it may damage the paint; if the refrigerant oil contacts the paint, wash it off immediately.
    • Be careful not to damage the radiator fins when installing the compressor and the A/C condenser fan shroud.