|
|
Do not insert your fingers into the installed throttle body when you turn the ignition switch to ON (II) or while the ignition switch is ON (II). If you do, you will seriously injure your fingers if the throttle valve is activated.
|
-
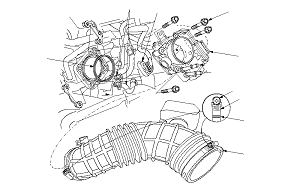
Remove the intake air duct (A).
-
Disconnect the throttle body connector (B).
-
Disconnect and plug the water bypass hoses (C).
-
Remove the throttle body (D).
-
NOTE:
-
If you replace or clean the throttle body, go to
Step 6
.
-
If you did not replace or clean the throttle body, this procedure is complete.
-
When torquing the screw of the hose band (F), align the edge of the hose band (G) with the mark (H) painted on the hose band.
|
|