-
Clean all parts thoroughly in solvent, and dry them with compressed air. Blow out all passages.
-
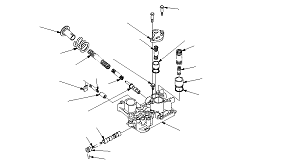
Inspect the valve body for scoring and damage.
-
-
Hold the regulator spring cap in place while removing the stop bolt. The regulator spring cap is spring loaded.
-
Coat all parts with ATF during assembly.
-
Replace the O-rings with new ones.
-
When reassembling the valve body, align the hole in the regulator spring cap with the hole in the valve body, then press the spring cap into the valve body, and tighten the stop bolt.
SPRING SPECIFICATIONS
|
Springs
|
Standard (New)-Unit: mm (in.)
|
|
Wire Diameter
|
O.D.
|
Free Length
|
No. of Coils
|
|
A
|
Stator reaction spring
|
4.5 (0.177)
|
35.4 (1.394)
|
30.3 (1.193)
|
1.92
|
|
B
|
Regulator valve spring A (For R20A3 engine model)
|
1.9 (0.075)
|
14.7 (0.579)
|
80.6 (3.173)
|
1.61
|
|
|
Regulator valve spring A (For K24Z3 engine model)
|
1.85 (0.073)
|
14.7 (0.579)
|
83.0 (3.268)
|
14.9
|
|
C
|
Regulator valve spring B
|
1.6 (0.063)
|
9.2 (0.362)
|
44.0 (1.732)
|
12.5
|
|
D
|
Torque converter check valve spring
|
1.2 (0.047)
|
8.6 (0.339)
|
33.8 (1.331)
|
12.2
|
|
E
|
Lock-up shift valve spring
|
1.0 (0.039)
|
6.6 (0.260)
|
35.5 (1.398)
|
18.2
|
|
F
|
3rd accumulator spring (For R20A3) engine model
|
2.5 (0.098)
|
14.6 (0.575)
|
29.9 (1.177)
|
4.9
|
|
|
3rd accumulator spring (For K24Z3 engine model)
|
2.5 (0.098)
|
14.6 (0.575)
|
29.4 (1.157)
|
4.9
|
|
G
|
1st accumulator spring A
|
2.4 (0.094)
|
18.6 (0.732)
|
49.0 (1.929)
|
7.1
|
|
H
|
1st accumulator spring B
|
2.3 (0.091)
|
12.2 (0.480)
|
31.5 (1.240)
|
6.6
|
|
|