-
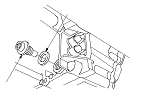
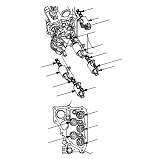
Remove the shift solenoid valve mounting bolts (F), then hold the shift solenoid valve body and remove the shift solenoid valves.
NOTE: Do not hold the shift solenoid valve connector to remove the shift solenoid valve.
-
Install new O-rings (two O-rings per shift solenoid valve) (G) on the shift solenoid valve.
NOTE: A new shift solenoid valve comes with new O-rings. If you install a new shift solenoid valve, use the O-rings provided with it.
-
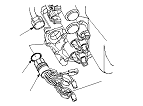
Install shift solenoid valve C (brown connector), shift solenoid valve D (black connector), and shift solenoid valve E (black connector) by holding the shift solenoid valve body; make sure the mounting bracket contacts the servo body.
Secure the shift solenoid valve C with the bolt.
NOTE: Do not hold the shift solenoid valve connector to install the shift solenoid valve. Be sure to hold the shift solenoid valve body.
-
Install shift solenoid valve B (brown connector) by holding the shift solenoid valve body; make sure the mounting bracket contacts the bracket of shift solenoid valve E.
-
Install shift solenoid valve A (brown connector) by holding the shift solenoid valve body; make sure the mounting bracket contacts the bracket of shift solenoid valve D.
NOTE: Do not install shift solenoid valves A and B before installing shift solenoid valves D and E. If shift solenoid valves A and B are installed before installing shift solenoid valves D and E, it may damage the hydraulic control system.
-
Secure shift solenoid valves B and E with the bolt, then secure shift solenoid valves A and D with the bolt.
-
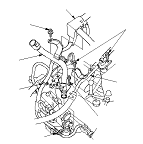
Connect the shift solenoid wire harness terminals to shift solenoid valves:
-
BLU wire connector to shift solenoid valve A.
-
ORN wire connector to shift solenoid valve B.
-
GRN wire connector to shift solenoid valve C.
-
YEL, WHT, and WHT wire connector to shift solenoid valve D.
-
RED wire connector to shift solenoid valve E.
-
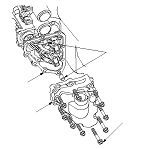
Install a new gasket, the dowel pins, and the shift solenoid valve cover.
-
Install a new O-ring on the ATF dipstick guide tube, then install the guide tube. Secure the guide tube with the bolts.
-
Check the shift solenoid wire harness connector for rust, dirt, or oil, and clean if necessary, then connect the connector securely.
-
Secure the ATF cooler line with the bolts.
-
Install the harness clamps on the clamp brackets.
-
Install the battery base.
-
Install the air cleaner housing and the intake air duct.
-
Install the splash shield.
-
Install the left front wheel.
-
NOTE: Do not the test-driving until
Step 34
.
-
|
|