ATF Level Check

NOTE: Keep all foreign particles out of the transmission.
  1. Park the vehicle on the level ground.
  1. Warm up the engine to normal operating temperature (the radiator fan comes on), and turn the engine off. Do not allow the engine to warm up more than two cycle of the cooling fan.
    NOTE: Check the ATF level within 60−90 seconds after turning the engine off. Higher ATF level may be indicated if the radiator fan comes on twice or more.
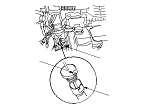
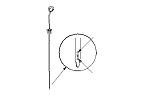
  1. Remove the ATF dipstick (yellow loop) (A) from the ATF dipstick guide tube, and wipe it with a clean cloth.
  1. Insert the ATF dipstick into the ATF dipstick guide tube aligning the notch (B) with the guide tab (C).

  1. Remove the ATF dipstick and check the ATF level. It should be between the upper mark (A) and the lower mark (B).
  1. If the ATF level is below the lower mark, check for fluid leaks at the transmission, the ATF cooler hoses and the line joints, and the cooler lines. If a problem is found, fix it before filling the transmission with ATF.
    NOTE: If the vehicle is driven when the ATF level is below the lower mark, one or more of these symptoms may occur:
    • Transmission damage will result.
    • Vehicle does not move in any gear.
    • Vehicle accelerates poorly, and flares when starting off in D, S, and R.
    • Vibration when the engine is idling.
  1. If the level is above the upper mark, drain the ATF to proper level.
    NOTE: If the vehicle is driven when the ATF level is above the upper mark, the vehicle may creep forward while in N, or have problem shifting.

  1. If necessary, fill the transmission with ATF through the ATF dipstick guide tube opening (A) to bring the fluid level between the upper mark and the lower mark of the ATF dipstick. Do not fill the fluid above the upper mark. Always use genuine Honda ATF-Z1 automatic transmission fluid (ATF). Using a non-Honda ATF can affect shift quality.
  1. Insert the ATF dipstick into the ATF dipstick guide tube aligning the notch with the guide tab.