|
NOTE:
-
Turn the ignition switch to ON (II).
-
NOTE: If the DVD will not eject, refer to symptom troubleshooting Navigation unit will not eject or accept the navigation DVD.
-
Turn the ignition switch to LOCK (0).
-
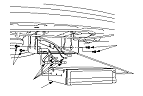
Remove the four bolts (A) from the navigation unit (B).
-
Disconnect the navigation unit connectors (B).
-
Remove the navigation unit (C).
-
Install the navigation unit in the reverse order of removal.
-
Install the DVD-ROM, then enter the 4-digit security code.
-
-
Give the new security code to the customer.
-
Turn the ignition switch to ON (II), then reinstall the customer's original DVD, verifying that the DVD is free of scratches or smudges.
-
Check any official Honda service website for more service information about patches for the navigation system. Apply any prescribed patches to the new navigation unit.
NOTE: Simply transferring the DVD from the original navigation unit to the new navigation unit does not assure the correct software for the vehicle will be loaded into the new navigation unit. Doing the DVD transfer without doing software patches may cause the new navigation unit to appear to be malfunctioning.
-
Enter the new navigation anti-theft code.
-
-
Give the new navigation anti-theft code to the customer.
|
|