Interior Trim Removal/Installation - Trunk Lid

Trunk Lid Trim Panel - For Some Models
NOTE:
  • Put on gloves to protect your hands.
  • Take care not to bend or scratch the panel.
  • When removing components, use the trim tools or equivalent.
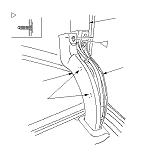
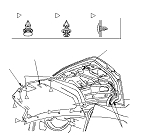
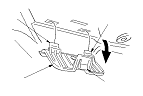
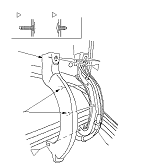
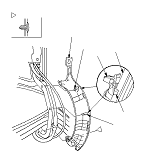
  1. On both sides, remove the clips fastening the trunk lid hinge trim A, B, and the trunk lid trim panel (C), then separate the upper portions of the trim A and B from the trunk hinge by detaching the hooks (D).

  1. Remove the clips (A, B, C). Remove both lower corner portions of the trunk lid trim panel (D) from under the trunk lid hinge trim (E) of both sides, and pull the trunk lid handle (F) through the hole (G) in the panel, then remove the panel.

  1. Pivot the trunk lid handle (A) down on the forward hooks (B) while prying the rear hook (C), then remove the handle.
  1. Install the panel in the reverse order of removal, and note these items:
    • If the clips are damaged or stress-whitened, replace them with new ones.
    • Push the clips and the hooks into place securely.

Trunk Lid Hinge Trim - For Some Models
NOTE:
  • Put on gloves to protect your hands.
  • Take care not to bend or scratch the panel.
  • When removing components, use the trim tools or equivalent.
  1. Remove the trunk side trim panel, as needed:
  1. Detach the clips (B, C), then remove the trunk lid hinge trim A by detaching the hooks (D).

  1. Remove the clip, then remove the trunk lid hinge trim B by detaching the hooks (A). On the right side on RHD model, release the trunk lid opener cable (C) from the hooks (D) of the trim.
  1. Install the trim in the reverse order of removal, and note these items:
    • If the clips are damaged or stress-whitened, replace them with new ones.
    • Right side: Make sure the trunk lid opener cable is routed properly.
    • Push the clips and the hooks into place securely.