|
NOTE:
-
Take care not to scratch the dashboard and its related parts.
-
When removing components, use the trim tools or equivalent.
-
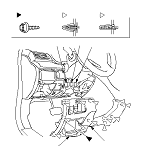
LHD model is shown; RHD model is symmetrical.
-
Loosen the tilt/telescopic lock lever, and adjust the steering column upward. Leave the lock lever still be loosened.
-
Remove the driver's dashboard lower cover (A).
|
-1.
|
Open the driver's pocket (B), and remove the screw (C).
|
|
-2.
|
Pull out the bottom of the cover to detach the clips (D).
|
|
-3.
|
Pull out along the edge of the cover to detach the clips (E, F).
|
-
Disconnect the connectors, if equipped:
-
The head light adjuster switch connector (G)
-
The headlight washer switch connector, the corner sensor connector, or the headlight adjuster switch/corner sensor switch connector (H)
-
The VSA/CMBS OFF switch connector (I)
-
Some RHD models: The ultrasonic sensor switch connector or the ultrasonic sensor switch/tilt sensor switch connector
|
|