Side Sill Panel Replacement

For Some Models
NOTE:
  • Put on gloves to protect your hands.
  • Take care not to scratch the body.
  1. Remove the side sill panel (A).
    -1.
    On the back of the front wheel arch, remove the screws (B).
    -2.
    Remove the expansion clips (C).
    -3.
    Slide the side sill panel forward and remove it. The side clips (D, E, F) will stay in the body.
    -4.
    Remove the side clip (D) by turning the clip 45 ° from the body.
    -5.
    Remove the side clip (E) from the body.
    -6.
    Remove the side clip (F) by releasing the double-sided adhesive tape (G) from the body.
  1. Scrape off the remaining double-sided adhesive tape from the front portion of the rear wheel arch, and clean the body surface with isopropyl alcohol.
  1. If the side clips are damaged or stress-whitened, replace them with new ones.

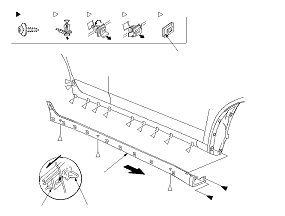
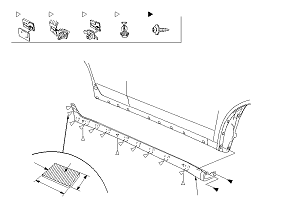
  1. If the side clip (A) will be reinstalled, scrape off the remaining double-sided adhesive tape from the clip, and clean the clip surface with isopropyl alcohol. Then attach the new double-sided adhesive tape (B) to the clip.
  1. Install the side clips (A, B, C) on the side sill panel (D). Peel off the adhesive backing from the double-sided adhesive tape on the side clip (A).
  1. Hold the panel up, and fit all the side clips into the holes in the body, then push on the panel until the clips snap into place.
  1. Install all the expansion clips (E).
  1. Install the screws (F).