Rear Bumper Removal/Installation

NOTE:
  • Put on gloves to protect your hands.
  • Have an assistant help you when removing and installing the rear bumper.
  • Take care not to scratch the rear bumper and the body.
  1. Remove the caps (A). Remove the clips (B), the screws (C, D), and the bolts (E) securing the rear bumper (F).
    NOTE: To remove the clips, pry the inner clip up at the edge near the line (G) on its head.

  1. Pull on the rear bumper (A) at the wheel arch areas to release it from the hooks (ten places) (B) on the side spacer (C).

  1. With the help of an assistant, while pulling the wheel arch portion away from the side spacer, pull the rear bumper (A) to release the bumper from the hooks (B) on the rear spacer (C).
  1. With the help of an assistant, repeat on the opposite side.

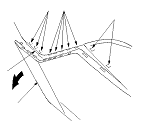
  1. With the help of an assistant, pull the rear bumper to release the bumper (A) from the hooks (four places) (B) on the upper brackets (C). With rear corner sensors and back sensors: While holding the bumper, disconnect the rear bumper corner sensor subharness connector (D).
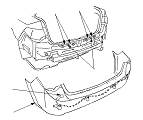
  1. Install the bumper in the reverse order of removal, and note these items:
    • If equipped, make sure the rear bumper corner sensor subharness connector is plugged in properly.
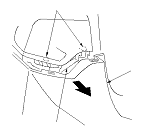
    • Make sure the rear bumper engages the hooks (of both side spacers and rear spacers) on each side securely.
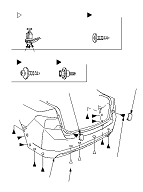
    • If the clips are damaged or stress-whitened, replace them with new ones.
    • Push the clips and the hooks into place securely.