-
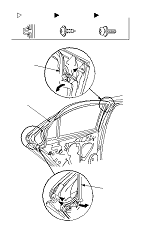
While removing the upper edge of the door outer molding (A) from the edge of the sash, cut the double-sided adhesive tape (B) with a utility knife, then remove the molding from the sash. Release the bottom hook (C), then remove the molding.
-
Scrape off the remaining double-sided adhesive tape from the sash, then clean the sash surface with a sponge dampened in isopropyl alcohol.
-
Install the new door outer molding in the reverse order of removal, and note these items:
-
Push the adhesive portions and the bottom hook portion into place securely.
-
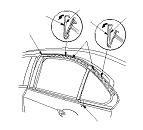
Make sure the upper and lower sides of the molding are catching the edges of the sash properly.
-
Push the door weatherstrip clips into place securely.
-
When reinstalling the door panel, make sure the plastic cover is installed properly and sealed around its outside perimeter to seal out water.
|
|