Front Door Outer Molding Replacement

NOTE:
  • If you remove the door outer molding, replace it with a new one because it will bend during removal.
  • Put on gloves to protect your hands.
  • Take care not to scratch the door.
  • When removing components, use the trim tools or equivalent.
  1. Remove these items:
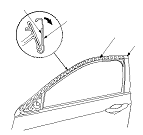
  1. Using a clip remover, detach the clip, then pull back the door weatherstrip (A), and remove the screw securing the door outer molding (B).

  1. While removing the upper edge of the door outer molding (A) from the edge of the sash, cut the double-sided adhesive tape (B) with a utility knife, then remove the molding from the sash.
  1. Scrape off the remaining double-sided adhesive tape from the sash, then clean the sash surface with a sponge dampened in isopropyl alcohol.
  1. Install the new door outer molding in the reverse order of removal, and note these items:
    • Push the adhesive portions into place securely.
    • Make sure the upper and lower sides of the molding are catching the edges of the sash properly.
    • Push the door weatherstrip clip into place securely.