|
Without Navigation System
NOTE:
-
Put on gloves to protect your hands.
-
Take care not to scratch the dashboard and related parts.
-
Lay a shop towel under the parts when working on them to protect the face panel from scratches or other damage.
-
Eject all the disc before remove the audio unit to prevent damaging the CD/DVD player's load mechanism.
-
If you are replacing the audio unit, write down the audio presets (if possible), then enter them into the new audio unit.
-
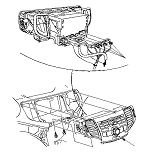
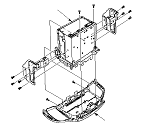
Remove these items:
-
Make sure you have the anti-theft codes for the audio system.
-
Remove the bolts, then pull out the audio unit (A).
-
Disconnect the connectors (B), then remove the audio unit.
-
|