Audio System Symptom Troubleshooting - No sound is heard from the speaker(s) (display is normal) (with premium audio system)

No sound is heard from the speaker(s) (display is normal) (with premium audio system)
NOTE:
  1. Turn the ignition switch to ON (II).
  1. Turn on the audio unit and make sure the volume button is not set to the MIN level.
Is it at the MIN level?
YES -
Raise the volume level, and recheck the function.■
NO -
Go to Step 3 .
  1. On the steering wheel, check the navigation talk command, and/or the Hands Free Telephone talk command function.
Are the navigation talk command and/or the HFT talk command function set?
YES -
Cancel the navigation talk command by pressing the navigation BACK button, and/or HFT talk command, press the HFT BACK button, then recheck the function.■
NO -
Go to Step 4 .
Do all speakers produce a tone?
YES -
System is OK at this time. Check for poor connections at the audio unit, speakers and stereo amplifier.■
NO -
Go to Step 5 .
  1. Turn the ignition switch to LOCK (0).
  1. Check the speaker(s) with on sound for any damage.
Is there any damage?
YES -
Replace the speaker and recheck.■
NO -
Go to Step 7 .
  1. Remove the speaker(s) with no sound, and disconnect its connector.
  1. Check the speaker 2P connector for a loose or poor connection.
Reconnect the speaker connector, and recheck the symptom; is the condition still present?
YES -
Go to Step 9 .
NO -
Intermittent failure. Operation is normal.■
Is the speaker OK?
YES -
Go to Step 10 .
NO -
Replace the speaker(s).■
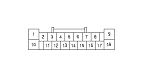
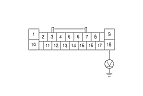
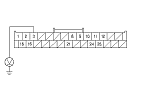
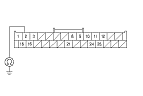
  1. Disconnect stereo amplifier connector A (18P) and the speaker connector.
  1. Check for continuity between body ground and stereo amplifier connector A (18P) according to the table.
    Speaker
    Stereo amplifier terminal
    Wire color
    Left front door speaker, Left front tweeter
    A16 (+)
    BLK
    A7 (−)
    BLU
    Right front door speaker, Right front tweeter
    A15 (+)
    RED
    A6 (−)
    GRN
    Left rear door speaker
    A13 (+)
    WHT
    A4 (−)
    GRN
    Right rear door speaker
    A12 (+)
    RED
    A3 (−)
    BLU
    Front center speaker
    A11 (+)
    YEL
    A2 (−)
    BLU
    Subwoofer
    A10 (+)
    GRY
    A1 (−)
    LT BLU
    Left rear speaker
    A17 (+)
    YEL
    A8 (−)
    BRN
    Right rear speaker
    A14 (+)
    BLU [PNK]
    A5 (−)
    ORN [BRN]

    [ ]:
    RHD model

Is there continuity?
YES -
Repair short in the wire(s) between the stereo amplifier and the speaker(s).■
NO -
Go to Step 12 .
  1. Connect the speaker connector terminal (+) and (−) with a jumper wire.

  1. Check for continuity between stereo amplifier connector B (18P) according to the table.
    Speaker
    Stereo amplifier terminal
    Wire color
    Left front door speaker, Left front tweeter
    A16 (+)
    BLK
    A7 (−)
    BLU
    Right front door speaker, Right front tweeter
    A15 (+)
    RED
    A6 (−)
    GRN
    Left rear door speaker
    A13 (+)
    WHT
    A4 (−)
    GRN
    Right rear door speaker
    A12 (+)
    RED
    A3 (−)
    BLU
    Front center speaker
    A11 (+)
    YEL
    A2 (−)
    BLU
    Subwoofer
    A10 (+)
    GRY
    A1 (−)
    LT BLU
    Left rear speaker
    A17 (+)
    YEL
    A8 (−)
    BRN
    Right rear speaker
    A14 (+)
    BLU [PNK]
    A5 (−)
    ORN [BRN]

    [ ]:
    RHD model

Is there continuity?
YES -
Go to Step 14 .
NO -
Repair open in the wire between the stereo amplifier and the speaker or door speaker network control unit.■
  1. Disconnect the jumper wire.

  1. Measure the voltage between stereo amplifier connector A (18P) terminal No. 18 and body ground.
Is there battery voltage?
YES -
Go to Step 16 .
NO -
Repair open in the wire between No. 15 (20 A) fuse in the passenger's under-dash fuse/relay box and stereo amplifier connector B (18P) terminal No. 18.■
  1. Disconnect stereo amplifier connector B (28P).
  1. Turn the ignition switch to ON (II).

  1. Measure the voltage between stereo amplifier connector B (28P) terminal No. 3 and body ground.
Is there battery voltage?
YES -
Go to Step 19 .
NO -
Repair open in the wire between stereo amplifier connector B (28P) terminal No. 3 and audio unit connector A (24P) terminal No. 17.■
  1. Turn the ignition switch to LOCK (0).

  1. Check for continuity between stereo amplifier connector A (18P) terminal No. 9, connector B (24P) terminal No. 2 and body ground.
Is there continuity?
YES -
Go to Step 21 .
NO -
Repair short to body ground in the wire between the stereo amplifier connector A (18P) No. 9 terminal, connector B (24P) terminal No. 2 and body ground (G601, G401): (G401) , (G601).
  1. Disconnect audio unit connector A (24P), stereo amplifier connector B (28P), and audio unit connector C (12P).
    NOTE: Eject all the CDs before disconnecting the audio unit and CD changer to prevent damaging the CD player's load mechanism.

  1. Check for continuity between audio unit connector A (24P), connector C (12P), and stereo amplifier connector B (28P) according to the table.
    Audio unit connector
    Stereo amplifier terminal
    A17 (WHT)
    B3 (YEL)
    A18 (GRN)
    B25 (RED)
    A19 (BLK)
    B11 (GRN)
    A21 (GRY)
    B12 (GRY)
    A22 (WHT)
    B24 (WHT)
    A23 (RED)
    B10 (BLK)
    C1 (RED)
    B1 (RED)
    C2 (GRN)
    B15 (GRN)
    C7 (GRY)
    B16 (GRY)

Is there continuity?
YES -
Go to Step 23 .
NO -
Repair open in the applicable wire(s) between the audio unit and stereo amplifier.■

  1. Check for continuity between stereo amplifier connector B (28P) and body ground according to the table.
    Stereo amplifier connector
    Wire color
    B1
    RED
    B3
    YEL
    B10
    BLK
    B11
    GRN
    B15
    GRN
    B24
    WHT
    B25
    RED

Is there continuity?
YES -
Repair short to body ground in the wire(s) between the audio unit and stereo amplifier.■
NO -
Go to Step 24 .

  1. Check for continuity between the terminals of stereo amplifier connector A (24P) according to the table.
    From terminals
    To terminals
    Stereo amplifier connector
    Audio unit connector
    Stereo amplifier connector
    Audio unit connector
    B16 (GRY)
    C7 (GRY)
    B1 (RED)
    C1 (RED)
    B15 (GRN)
    C2 (GRN)
    B12 (GRY)
    A21 (GRY)
    B25 (RED)
    A18 (GRN)
    B11 (GRN)
    A19 (BLK)
    B24 (WHT)
    A22 (WHT)
    B10 (BLK)
    A23 (RED)
    B1 (RED)
    B1 (RED)

Is there continuity between any of the terminals?
YES -
Repair short in the wire(s) between the audio unit and stereo amplifier (replace the appropriate shielded harness).■
NO -
Substitute a known-good audio unit and recheck. If the symptom/indication goes away, replace the original audio unit, If the symptom is still present, substitute a known-good stereo amplifier and recheck. If the symptom/indication goes away, replace the original stereo amplifier.