Brake Master Cylinder Replacement

  • Do not spill brake fluid on the vehicle; it may damage the paint; if brake fluid gets on the paint, wash it off immediately with water.
  • Be careful not to damage or deform the brake lines during removal and installation.
  • Plug the end of a hose and joints to prevent spilling brake fluid.
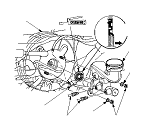
NOTE: The illustrations show LHD model, RHD model is similar.
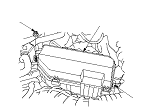
  1. LHD model: Remove the under-hood fuse/relay box mount nut (A) and release the clip (B), then remove the under-hood fuse/relay box (C) aside.
  1. Remove the reservoir cap and the brake fluid from the master cylinder reservoir with a syringe.

  1. Disconnect the brake fluid level switch connector (A).
  1. Disconnect the brake lines (B) from the master cylinder (C). To prevent spills, cover the hose joints with rags or shop towels.
  1. Remove the master cylinder mounting nuts (D) and the washers (E).
  1. Remove the master cylinder from the brake booster (F). Be careful not to bend or damage the brake lines when removing the master cylinder.
  1. Remove the rod seal (G) from the master cylinder.
    NOTE: During installation, set the new rod seal onto the master cylinder with its grooved side (H) toward the master cylinder.
  1. Install the master cylinder in the reverse order of removal, and note these items:
  1. LHD model: Install the under-hood fuse/relay box.
  1. Spin the wheels to check for brake drag.