Front Upper Arm Replacement

Special Tools Required

Ball joint remover, 28 mm
 07MAC-SL00201
  1. Remove the front wheel.
  1. Remove the cotter pin (A) from the upper arm ball joint, then remove the castle nut (B).

  1. Remove the upper arm mounting bolts (A), then remove the upper arm (B).

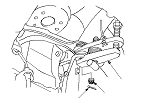
  1. Install the upper arm (A), and lightly tighten the new upper arm mounting bolts (B), then connect the knuckle, and lightly tighten the castle nut (C).
    NOTE:
    • Be careful not to damage the ball joint boot when connecting the knuckle.
    • Before connecting the ball joint, degrease the threaded section and the tapered portion of the ball joint pin, the ball joint connecting hole, the threaded section and the mating surfaces of the castle nut.
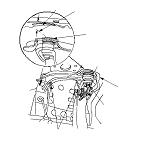
  1. Place a floor jack under the lower arm, and raise the suspension until the clearance between the top (D) of the upper arm ball joint and the backside of the fender cut out point (E) is 40 mm (1.6 in.), then tighten the upper arm mounting bolts to specified torque value.
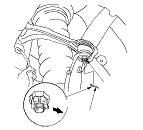
  1. Lower the floor jack.
  1. Place the floor jack under the lower arm, and raise the suspension to load it with the vehicle's weight.

  1. Tighten the castle nut (A) on the upper arm ball joint to the specified torque value.
    NOTE:
    • Torque the castle nut to the lower torque specification, then tighten it only far enough to align the slot with the ball joint pin hole. Do not align the castle nut by loosening it.
    • Insert the new cotter pin (B) into the ball joint pin hole from the front to the rear of the vehicle, and bend its end as shown. Check the ball joint pin hole direction before connecting the ball joint.
  1. Clean the mating surfaces of the brake disc and the inside of the wheel, then install the front wheel.